.
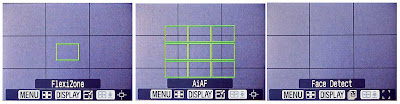
The first posting in this series on focusing showed the five auto focus modes possible with the G9. The second posting explained how the hyperfocal and depth-of-field concepts benefit and limit focusing. Now let’s examine and compare the results when using the various auto focus modes. For this posting, a landscape scene was photographed using each auto focus mode. The G9 was mounted on a tripod and the composition was not changed from shot to shot. The focal length was near the middle of the zoom range. Exposure was set at 1/60 sec and f4.5 in manual exposure mode for ISO80 sensitivity for all shots. The G9 was set for Raw+jpg mode but all images here are from the in-camera jpg for consistency. The image shown here is the first one taken; the auto focus was set for Flexizone using the small frame because this is the way I normally focus. The small focus frame was placed on the front of the canoe.
The G9 has a nice feature for checking focus that I’d forgotten about. Here’s the display showing the focus point for the above image. This feature is available in both shooting (page 86) or playback modes (page 162). (But if your practice is to focus, recompose and shoot, as is mine, then the focus check does not remember that first focus point.) I paced off the distance from the G9 to the canoe; it was about 115 feet. My workhorse software, BreezeBrowser, says that the focus distance was set at 82 feet. Strangely, neither Canon’s ZoomBrowser nor Adobe’s Photoshop include focus distance in the image properties.
From the G9 Hyperfocal Chart, the hyperfocal distance for 25mm focal length and f4.5 is 76 feet. With the focus distance actually set at 82 feet, everything from 39 feet to infinity should be in focus. (OK, I didn’t think ahead on this one but used DofMaster directly.) Although the basis of depth-of-field is not pixel peeking, when examining the full image file, it seems to me that the in-focus distances are from about halfway to the canoe to infinity – as predicted in the DofMaster calculation. So even though the G9 selected the focus point I wanted, it set a slightly different actual distance; however, the final result was essentially the same as if the G9 had set the exact distance.
What about the other focus modes? Results varied.
The large Flexizone frame also fixed on the front of the canoe but the focus distance was actually set at 66 feet. This is probably because the large focus frame includes more of the foreground than does the small frame. Results were good with, by computation, everything from 35 feet to 493 feet in focus.
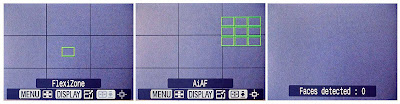
Surprisingly, the small AiAF frames did not do very well and I don’t understand why. The focus distance was set for only 43 feet so everything from 28 to 99 feet was in focus but the distant background was blurred. The large AiAF frame actually was more accurate than the small frame with respect to the distance to the canoe. Using large frame AiAF, the focus distance was set at 72 feet.
Using face detection focusing but without faces in the scene, the G9 logic switches to large frame AiAF and, again, the focus distance was set at 72 feet.
Lastly, I switched to manual focus and dialed in infinity. BreezeBrowser interpreted this setting as 216 feet. In that case, everything from 56 feet to infinity should be in focus. Pixel peeking the manually focused image, I see the relative differences but differences are small except in comparison to the small AiAF closer focused image.
Based on this experience, I’ll be continuing my current practice: small frame Flexizone, focus, recompose, shoot. But indoor photography, usually without the benefits of hyperfocal focusing, can be more challenging. Next I’ll take a closer look at face detection.
The first posting in this series on focusing showed the five auto focus
 modes possible with the G9. The second posting explained how the hyperfocal and depth-of-field concepts benefit and limit focusing. Now let’s examine and compare the results when using the various auto focus modes. For this posting, a landscape scene was photographed using each auto focus mode. The G9 was mounted on a tripod and the composition was not changed from shot to shot. The focal length was near the middle of the zoom range. Exposure was set at 1/60 sec and f4.5 in manual exposure mode for ISO80 sensitivity for all shots. The G9 was set for Raw+jpg mode but all images here are from the in-camera jpg for consistency. The image shown here is the first one taken; the auto focus was set for Flexizone using the small frame because this is the way I normally focus. The small focus frame was placed on the front of the canoe.
The G9 has a nice feature for checking focus that I’d forgotten about.
 Here’s the display showing the focus point for the above image. This feature is available in both shooting (page 86) or playback modes (page 162). (But if your practice is to focus, recompose and shoot, as is mine, then the focus check does not remember that first focus point.) I paced off the distance from the G9 to the canoe; it was about 115 feet. My workhorse software, BreezeBrowser, says that the focus distance was set at 82 feet. Strangely, neither Canon’s ZoomBrowser nor Adobe’s Photoshop include focus distance in the image properties.
From the G9 Hyperfocal Chart, the hyperfocal distance for 25mm focal length and f4.5 is 76 feet. With the focus distance actually set at 82 feet, everything from 39 feet to infinity should be in focus. (OK, I didn’t think ahead on this one but used DofMaster directly.) Although the basis of depth-of-field is not pixel peeking, when examining the full image file, it seems to me that the in-focus distances are from about halfway to the canoe to infinity – as predicted in the DofMaster calculation. So even though the G9 selected the focus point I wanted, it set a slightly different actual distance; however, the final result was essentially the same as if the G9 had set the exact distance.
What about the other focus modes? Results varied.
The large Flexizone frame also fixed on the front of the canoe but the focus distance was actually set at 66 feet. This is probably because the large focus frame includes more of the foreground than does the small frame. Results were good with, by computation, everything from 35 feet to 493 feet in focus.
Surprisingly, the small AiAF frames did not do very well and I don’t understand why. The focus distance was set for only 43 feet so everything from 28 to 99 feet was in focus but the distant background was blurred. The large AiAF frame actually was more accurate than the small frame with respect to the distance to the canoe. Using large frame AiAF, the focus distance was set at 72 feet.
Using face detection focusing but without faces in the scene, the G9 logic switches to large frame AiAF and, again, the focus distance was set at 72 feet.
Lastly, I switched to manual focus and dialed in infinity. BreezeBrowser interpreted this setting as 216 feet. In that case, everything from 56 feet to infinity should be in focus. Pixel peeking the manually focused image, I see the relative differences but differences are small except in comparison to the small AiAF closer focused image.
Based on this experience, I’ll be continuing my current practice: small frame Flexizone, focus, recompose, shoot. But indoor photography, usually without the benefits of hyperfocal focusing, can be more challenging. Next I’ll take a closer look at face detection.
.