Showing posts with label lcd. Show all posts

Friday, May 23, 2008

G9: Focus on Focusing

.
The G9 is an extremely versatile camera. Among its many options are (at least) five different choices for automatic focusing methods plus manual focus. I’ve always used the same method in the past but it is past time to learn the others so the next several posting will be about focusing the G9.
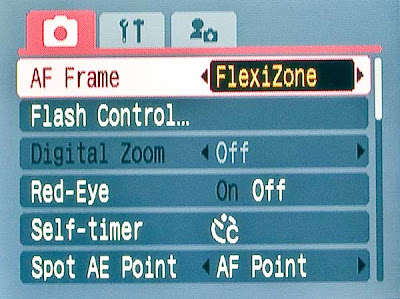
The G9 automatic focus methods are:

Flexizone – a single rectangular frame normally in the center of the display but which can be moved as desired. The frame can be large or small. The G9 focusing logic sets the focus distance so that the object in this frame is in focus.

AiAF – A 3x3 matrix of rectangular frames in the center of the display. These frames can be large or small. Only the small frame matrix can be moved off center. The G9 focusing logic somehow selects one or more of these frames and sets the focus distance accordingly. (“AiAF” apparently means “Artificial Intelligence Auto Focus” but I can’t find that definition in the manual.)

Face Detection – Magically, the G9 detects faces (or objects resembling faces) and sets the focus accordingly.

The autofocus mode is a menu setting (page 116 of the manual) as shown above but can also be set with a few button presses on the back of the G9 as shown here. First, with the G9 in shooting mode, press the AF frame button (numbered 19 on page 42 of the manual) shown circled here. The display will change as shown (but with the current AF frame selection). The AF frame selection is then toggled between Flexizone, AiAF and Face Detection by pressing the Menu button, examples are shown below.
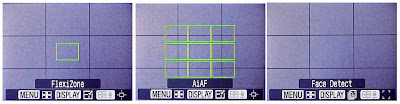

For Flexizone and AiAF, the size of the frame can be changed by pressing the Display button, the smaller frames are shown below. Both Flexizone and the small AiAF frames can be moved with the Control Dial.
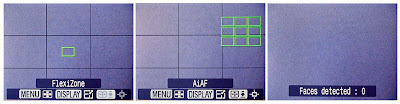

When in Face Detection mode, pressing the Display button indicates how many faces are detected.

When using the G9, I always recommend pressing the shutter button halfway to achieve focus. Once focus is achieved, the G9 gives two quick beeps and the focus frame turns green.

My normal practice is to use the small Flexizone frame in the center position to obtain focus on the subject of interest. I press the shutter button halfway to achieve focus, hold the button at the halfway position, recompose and shoot. To get a second or similar shot, I might switch to manual focus because the manual focus position is retained until the next autofocus.
.

Monday, March 24, 2008

Was it really focused?

.
When the G9 has acquired focus, it actually beeps twice (very quickly) and the AF frame on the LCD is green. If the G9 is confused about the focus, it beeps only once and the AF frame on the LCD is yellow. Granted, the beeps are difficult to distinguish and sometimes the yellow vs green is not so obvious either but this is the way the G9 tells you that it thinks it is focused.
.

Sunday, March 16, 2008

G9 on Parade

.
I took my G9 to a St. Patrick’s Day Parade this weekend. It was nice day, an even nicer outing and a nice parade. I was able to get some good snapshots but no real prize winners. Photographing the parade reminded me of several shortcomings of the G9:

1. No built-in sun screen and the G9 is too small to provide shade.
2. No built-in fluid reservoir in the G9
3. No built-in features to clone away the power lines
4. Can’t read the LCD display if wearing polarized sunglasses
5. Lensmate (or Canon) adapter interferes with the optical viewfinder
6. Optical viewfinder is not accurate, must offset for parallax
7. Shutter lag makes capturing the “decisive moment” difficult

All in all, I had a good day at the parade -- and the G9 was part of it.
.

Sunday, December 16, 2007

G9 Display in Flash Mode

There are many ways to do flash photography with the Canon G9. I've given some examples here, here and here and will be giving more. As always, I recommend that you do as I do and follow Strobist for learning off-camera flash. Meanwhile, seeing the variation in the G9 flash display might help clear up some confusion.

With the G9 in Program mode, turn the built-in flash on, press the Function Set button and scroll down to the flash adjustments. The G9 display should look like this:


The idea here is that you can increase or decrease the flash effect as compared to what the G9 thinks it should have been. This adjustment is independent of the shutter speed or aperture selected by Program mode.

But if the G9 is in Manual exposure mode, the flash display looks like this:


In G9 Manual exposure mode, YOU control the amount of flash. It’s not difficult, take a trial shot and adjust the setting with the Control Dial. Unfortunately, the adjustments are limited to Full, 2/3 Full and 1/3 Full power.

With external flash mounted on the G9, the display looks different. Here’s the display with a Canon 580EX mounted in the hotshoe; again, the G9 is in Manual exposure mode:


With the 580EX mounted and the G9 in Manual exposure, you still must manually adjust the flash; however, you can turn down the flash to 1/64 power (and to 1/128 with the 580EX II). The display is the same whether the 580EX is in ETTL or its own manual mode. It seems easier to me to leave the 580EX in ETTL and make the adjustment on the G9. A nice touch is that even older Canon flashes like the 420EX and 380EX that do not have manual adjustments on the flash can be adjusted with the G9 just like the 580EX.

If a non-Canon flash is mounted, the G9 display looks as shown below:


The flash adjustments are grayed out and are not usable. You’ll have to adjust the non-Canon flash through its own on-flash adjustment (if any). This isn’t particularly difficult; I do it frequently with a Nikon SB-28 and SB-24.

And yes, that’s a door frame in my illustration photos! All photos of the G9 taken with the old faithful G3.