Showing posts with label Manual. Show all posts

Tuesday, January 24, 2012

G1X User Guide Notes (Part 3)

G1X User guide cover pageContinuing to read in the G1X User Guide and post thoughts and differences as compared to the G12 …

Playback Mode includes editing and I’ve rarely edited in-camera – except to delete mistakes! It’s interesting to me to realize how many people keep an album on their camera.

Scroll Display. I don’t care for the Scroll Display when viewing images and didn’t realize it could be turned off (p141). Scroll Display is now OFF on my G12.

Grouped images. Images shot in burst mode can be view individually or ungrouped but this takes a few button presses and use of the Main Menu (p148). Seems awkward to me but I’ll try it because burst mode is likely to be useful.

Hints and Tips. Like the G12, the G1X comes configured to display brief hints and tips while working through the various settings and menus. After a while, these hints and tips are no longer needed and can be turned off (p173).

Formatting. As a carry-over from past (bad) experiences, I always format memory cards from the device they are to be used in. I reformat frequently but usually not at “Low Level”. Formatting the G1X memory card appears to be the same as formatting the G12 memory card.

Copyright. Copyright information can be entered from the Main Menu of the G1X. This was not possible with the G12 (although it could be set in Canon software and transferred to the G12).

Accessories.  Most of the G1X accessories will probably not be interchangeable with G12 accessories.

Battery. As noted previously, the battery is different from the G12 battery and offers fewer shots per charge.

AC Adapter Kit. I have the ACK-DC50 AC Adapter Kit for my G12; however, the G1X requires the ACK-DC80 – no doubt because the dummy battery is different.

Macrolite adapters will be different from the G12 even though the macro ring lite is (apparently) the same.

Cases. Soft cases and underwater cases are different from the G12 because, obviously, the G1X is larger.

Lens Hood. Canon offers the LH-DC70 lens hood for the G1X; this is new as far as I can tell.

Filters. Like the G12, the G1X uses 58mm filters; however, I expect some difficulty here. G12 filters are placed on a lens adapter. G1X filters are placed on a filter adapter, FA-DC58C. Looks like the hood attaches in the same way as the filter adapter which means that hood and filter adapter cannot be used at the same time. I expect the G1X to eventually have a lens adapter – even if from a third party – that uses a larger filter size and can accept conversion lens.

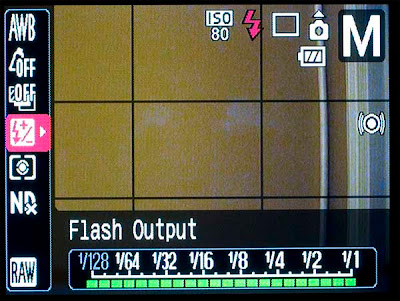
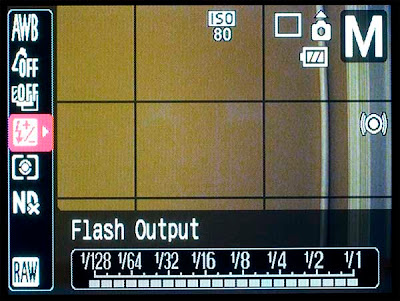
External Flash. I am extremely curious about external flash with the G1X. Flash is covered in Section 8; however, it does not satisfy my curiosity. One of my biggest complaints about the G series has been that its external flash capability appears to be intentionally crippled as compared to the Canon DSLR. Specifically, when a G series camera is placed in Manual exposure mode, the flash controls also become fully manual. Said a different way, there is no ETTL automatic flash control when a G series camera is in Manual exposure. Although I had high hopes that external flash on the G1X would be more like Canon DSLR, it more and more appears to be standard G series logic and controls for flash – in spite of the hopes raised by the wording on the external flash chart on page 204.  I am afraid that the G1X does not meet my hopes for external flash.


This concludes my reading and posting from the G1X User Guide.  The use and operation of the G1X appears to be much more similar than different from the G12 and even prior G series PowerShots.  In most ways, this similarity is a welcome feature.  I’m awaiting the delivery of my G1X even more anxiously than ever.

Sunday, January 22, 2012

G1X User Guide Notes (Part 2)

G1X User guide cover pageIn a previous post, I began reading the G1X User Guide and making notes of the differences between the new G1X and my current G12.  This post picks up at Section 3:  Other Shooting Modes.

Section 3 is primarily concerned with the other automated shooting modes such as SCN, Filters and Movies. I’ve rarely used SCN modes because RAW files are not available with the SCN mode. Creative Filters is somewhat interesting but, again, no RAW.

HDR. I did try the in-camera G12 HDR and will be trying G1X HDR as well. With the G12, I preferred to produce my own HDR images using Photomatix.  Like the G12, the G1X in-camera HDR is generated from three bracketed shots with a choice of five processing variations: no effect, sepia, B/W, super vivid, poster.

Miniature effect. The Miniature Effect blurs the upper and lower portions of the image. It is available in still or movies on the G1X but only movies on the G12.

Movie Digest. I admit to be curious and interested in Movie Digest. When shooting in Movie Digest mode, short video clips are made prior to taking a still image. The G1X then combines all the clips from that day into a single video file. Cute and not available in the G12.  I wonder about mixing various stills and Digest image files on the same memory card.  How does the G1X know when to combine all the clips? 

High-speed Burst. This feature was one of the bragging points in launching the G1X. It is available only in the SCN mode and generates 4.5 images per second but is limited to 6 consecutive images. The consecutive shots are considered part of a “group”. During playback only the first image will be displayed. If that image is erased then the entire group is erased! (Glad I read that!)  Groups can be “ungrouped” – more instructions to read.

Movies. In “Movie Mode”, movies are nearly fully automated but some adjustments are available: Exposure adjustment (but not with the top dial), AF frame, manual focus, self timer, ND filter, white balance (p92).

Movies in P Mode. Interestingly, movies can also be recorded when the top dial is in P mode by pressing the Movie button. Function and Menu settings may be changed automatically if necessary.  Wonder if there’s an advantage to shooting movies from P Mode?

Auto ISO. Maximum for Auto ISO is 1600; this is set in the main Menu.

Noise reduction. There are three levels of noise reduction in the main Menu.

i-Contrast. For problems with highlights, adjust “Dynamic Range”. For problems with shadows, adjust “Shadow Correct”. These are the same as for the G12 but I’m hoping that typing it will help me to remember! Available through the Function settings but not available in RAW modes.  Not available when shooting RAW+JPEG.

Preset focal lengths. By assigning the zoom function to the front dial, present focal lengths of 28, 35, 50, 85, 100, 112 mme are available as steps in the zoom range. Not available in Movie mode.

Powered IS is an additional image stabilization mode for “slow” camera movement while filming movies.

That’s it for instructions on taking pictures; next is Playback instructions.

Sunday, August 23, 2009

G9 Shutter Lag

.

I’m one of the complainers about shutter lag with my G9 – even in manual mode – and, in the midst of a debate on a DPReview forum decided to conduct my own tests. But how to do so? At first, I imagined all sorts of timer circuitry, switches, etc. but since I don’t really know how to do that sort of thing, finally decided to try simply taking a photo of my computer screen. This crude approach actually worked surprisingly well – sort of.

I searched for an on screen timer and downloaded XNote Timer . This is a basic and free version of their more comprehensive XNote Stopwatch. The image above is one of the several hundred shots I took of XNote Timer from my LCD. (I know, I know – sort of sad, isn’t it?)

I was especially curious about differences in shutter lag with and without Image Stabilization (IS), the effect of the half-pressed shutter button (sometimes called pre-focus) and the quickness of all manual mode with IS off, display off, etc.

Both Imaging Resource and DPReview publish shutter lag values but their test results did not completely satisfy my curiosity. According to Imaging Resource, the G9 shutter lag is from 0.57 seconds at wide angle to 0.69 seconds at telephoto. When prefocused, the shutter lag is 0.088; with manual focus (but presumably auto exposure) the shutter lag is 0.58 seconds. According to DPReview, the full press lag is about 0.6 seconds; the half press lag is about 0.12 seconds with the LCD turned on but decreases to about 0.05 seconds if the LCD is off. I don’t have any particular reason to dispute these values.

No, the shutter lag of my G9 was never the 40.63 seconds in the picture. After starting XNote Timer, I took a picture every 10 seconds. (I watched the computer monitor – not the G9 display.) So the example represents the 4th shot and the delay was 0.63 seconds. I usually took a dozen shots (2 minutes worth), discarded any obvious long or short times and averaged those remaining. Here’s what I found.

Base Case (my typical setup): Av mode, RAW+JPEG, display on, evaluative metering, small flex frame focus, shot only IS on, AWB. Full press lag = 0.61 seconds.

Same as Base Case (above) but timed from shutter button half-pressed: Lag = 0.15 seconds! In spite of the crudeness of my method, the improvement in shutter lag was obvious. Additionally, I found that the half pressed shutter button reduced shutter lag time to about 0.15 seconds no matter what options were selected in the menu or function settings.

Base Case but with manual exposure, manual focus, IS off. Lag = 0.23 seconds. This test was done with a full length press of the shutter button. Again, lag was reduced to about 0.15 seconds when the shutter button was half pressed prior to completing the press.

In some tests, turning IS off shaved about 0.1 seconds from the shutter lag but other times there was no measured effect on the average time. All these tests were hand held and perhaps I was more steady some of the time. I’d guess that IS probably adds about 0.1 seconds to the lag.

Interestingly, I found that by turning off RAW and using JPEG only, setting white balance (instead of using auto white balance) and reducing resolution to M3 with Normal compression reduced shutter lag by about 0.2 seconds from the Base Case. This was unexpected but perhaps not really correct because by that time I was getting pretty good at taking the shutter lag test. As I got better and better at taking the shutter lag test, I even recorded some negative shutter lag! That is, I jumped the gun a bit while anticipating the 10 second interval. As my own lag improved, the first series of tests had to be repeated.

So I learned some things about shutter lag. The very best technique is, as expected, to first press the shutter button halfway to obtain focus, exposure, set the IS, etc. Complete the shutter button press on seeing/hearing the G9 confirm that it is ready. Full manual mode (manual exposure and manual focus with display off, IS off) is better than I’ve been crediting it.

Granted, this technique isn’t great but it was an instructive exercise and perhaps will be useful to others. My own reflexes are not particularly quick so these speeds should be easily beaten. Try a few variations and learn more about shutter lag.

.

Sunday, May 25, 2008

G9 Hyperfocal Chart

.
Continuing the series on focusing the G9, knowledge of the hyperfocal distance is extremely useful when focusing any camera. Previous postings have included observations about the G9’s use of hyperfocal focusing and depth of field for closeups.

Somewhat loosely speaking, but easy to remember, is that if a camera is set for the hyperfocal distance then everything from that distance to infinity is acceptably in focus. In fact, everything from half that distance to infinity is in focus. For more details, check Wikipedia .

A most useful reference for both hyperfocal distance and depth of field is DOFMaster . Since both hyperfocal distance and depth of field vary with digital sensor size and focal length, here’s a chart of hyperfocal focusing distance specifically for the Canon G9 that was made by using the DOFMaster online calculations.


In addition to the hyperfocal distance, the table includes the near/far distance that is in focus when the G9 is focused at 10 feet. Why 10 feet? When the G9 is first turned on and switched to manual focus, it is set for (roughly) 10 feet.

Here’s an example of how the chart can be used. With your G9 turned off, set the Av mode at f5.6. Now turn the G9 on. The default focal length is the wide angle (7.4mm focal length) when the G9 comes on in Av mode. Immediately, switch to manual focus. You’ll see that the default focus distance is about 10 feet. Referring to the chart above for the 7.4mm lens, the hyperfocal length at an aperture of f5.6 is 5.3 feet. This means that, if the focus distance had been set for 5.3 feet then every distance from 2.65 feet (=5.3/2) to infinity would have been in focus. However, the default distance is 10 feet so everything from 3.5 feet (near focus) to infinity is in focus.

The G9 almost does not require focusing at the wide angle setting! But this happy situation changes dramatically at the longer focal lengths as shown in the chart.

Since aperture, focal length and manual focus distance can be saved as a custom setting (page 109 in the manual), the G9 can be preset for special situations -- including hyperfocal focusing.
.

Friday, May 23, 2008

G9: Focus on Focusing

.
The G9 is an extremely versatile camera. Among its many options are (at least) five different choices for automatic focusing methods plus manual focus. I’ve always used the same method in the past but it is past time to learn the others so the next several posting will be about focusing the G9.

The G9 automatic focus methods are:

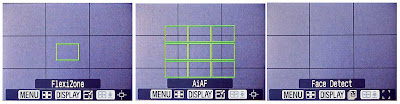
Flexizone – a single rectangular frame normally in the center of the display but which can be moved as desired. The frame can be large or small. The G9 focusing logic sets the focus distance so that the object in this frame is in focus.

AiAF – A 3x3 matrix of rectangular frames in the center of the display. These frames can be large or small. Only the small frame matrix can be moved off center. The G9 focusing logic somehow selects one or more of these frames and sets the focus distance accordingly. (“AiAF” apparently means “Artificial Intelligence Auto Focus” but I can’t find that definition in the manual.)

Face Detection – Magically, the G9 detects faces (or objects resembling faces) and sets the focus accordingly.

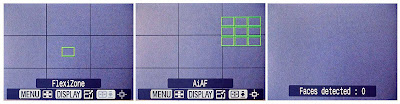
The autofocus mode is a menu setting (page 116 of the manual) as shown above but can also be set with a few button presses on the back of the G9 as shown here. First, with the G9 in shooting mode, press the AF frame button (numbered 19 on page 42 of the manual) shown circled here. The display will change as shown (but with the current AF frame selection). The AF frame selection is then toggled between Flexizone, AiAF and Face Detection by pressing the Menu button, examples are shown below.


For Flexizone and AiAF, the size of the frame can be changed by pressing the Display button, the smaller frames are shown below. Both Flexizone and the small AiAF frames can be moved with the Control Dial.


When in Face Detection mode, pressing the Display button indicates how many faces are detected.

When using the G9, I always recommend pressing the shutter button halfway to achieve focus. Once focus is achieved, the G9 gives two quick beeps and the focus frame turns green.

My normal practice is to use the small Flexizone frame in the center position to obtain focus on the subject of interest. I press the shutter button halfway to achieve focus, hold the button at the halfway position, recompose and shoot. To get a second or similar shot, I might switch to manual focus because the manual focus position is retained until the next autofocus.
.

Sunday, December 16, 2007

G9 Display in Flash Mode

There are many ways to do flash photography with the Canon G9. I've given some examples here, here and here and will be giving more. As always, I recommend that you do as I do and follow Strobist for learning off-camera flash. Meanwhile, seeing the variation in the G9 flash display might help clear up some confusion.

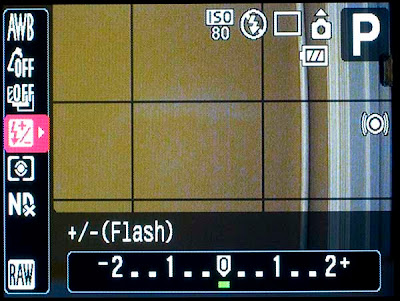
With the G9 in Program mode, turn the built-in flash on, press the Function Set button and scroll down to the flash adjustments. The G9 display should look like this:


The idea here is that you can increase or decrease the flash effect as compared to what the G9 thinks it should have been. This adjustment is independent of the shutter speed or aperture selected by Program mode.

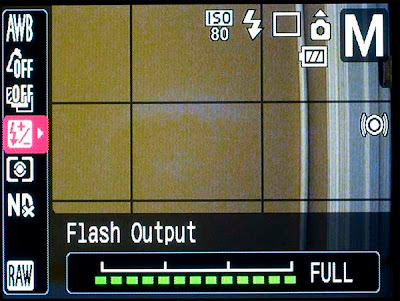
But if the G9 is in Manual exposure mode, the flash display looks like this:


In G9 Manual exposure mode, YOU control the amount of flash. It’s not difficult, take a trial shot and adjust the setting with the Control Dial. Unfortunately, the adjustments are limited to Full, 2/3 Full and 1/3 Full power.

With external flash mounted on the G9, the display looks different. Here’s the display with a Canon 580EX mounted in the hotshoe; again, the G9 is in Manual exposure mode:


With the 580EX mounted and the G9 in Manual exposure, you still must manually adjust the flash; however, you can turn down the flash to 1/64 power (and to 1/128 with the 580EX II). The display is the same whether the 580EX is in ETTL or its own manual mode. It seems easier to me to leave the 580EX in ETTL and make the adjustment on the G9. A nice touch is that even older Canon flashes like the 420EX and 380EX that do not have manual adjustments on the flash can be adjusted with the G9 just like the 580EX.

If a non-Canon flash is mounted, the G9 display looks as shown below:


The flash adjustments are grayed out and are not usable. You’ll have to adjust the non-Canon flash through its own on-flash adjustment (if any). This isn’t particularly difficult; I do it frequently with a Nikon SB-28 and SB-24.

And yes, that’s a door frame in my illustration photos! All photos of the G9 taken with the old faithful G3.

Wednesday, December 12, 2007

G9 with Canon External Flash


Having a hotshoe for external flash is a great feature of the Canon G9. The G9 works well with Canon’s recent flashes and even some of the older ones. Just be aware that the G9 is small in comparison to some of these external flashes so the combination can be somewhat unwieldy. Also, the flash can cost almost as much as the G9! Here are some simplistic examples using the Canon 580EX on the G9.


Imagine that you come upon Woof-Woof in his favorite chair. Naturally, your G9 is in your hand and you quickly get the above shot using Program mode and ISO 80. The G9, being in Program mode with flash turned off, selected an exposure of 1/60 second at f3.2. As a result, the bright outdoor scene is overexposed and the indoor scene is underexposed. Flash is needed to bring up the interior lighting level. But if you use the built-in G9 flash, you can be certain of creating red-eye in poor Woof-Woof. You grab that big, expensive 580EX, fasten it to the G9 hotshoe and fire off another shoe before Woof-Woof knows what’s happening.


For this second shot, shown above, the G9, still in Program Mode but knowing that a Canon ETTL flash is in the hotshoe, again selected an exposure of 1/60 and f3.2. This is somewhat better but now it looks like a “flash” picture. Notice that the bright outdoor scene is still overexposed because the shutter speed and aperture have not changed. Determined, you remember about bounce flash, rotate the 580EX flash head towards the white ceiling and grab another shot.


Still in Program Mode, the G9 is convinced that 1/60 and f3.2 is the correct exposure; however, bouncing has softened the flash considerably as shown in the above photo. The outdoor scene is still overexposed. Suddenly you remember that a correct exposure for bright outdoors is given by the Sunny 16 rule as modified for the G9. Pretending to shoot the outdoor scene (only) through the window, sure enough: 1/500 and f5.6 is about right. You change the G9 to Manual Mode, set shutter speed to 1/500 and aperture to f5.6 and fire off a shot.


Finally, the indoor and outdoor scenes are properly exposed. Good dog, Woof-Woof!

Later you notice something odd: That last shot was not actually taken at 1/500 and f5.6 even though you know that those were the settings on the G9. That last shot was actually taken at 1/250 and f5.6. Checking the histogram, the outdoors is a little overexposed and the sky has a few blinking highlights. How could this have happened?

In Manual Mode with a Canon ETTL flash attached, the G9 will not allow shutter speeds faster than 1/250 second. If you set a faster shutter speed in Manual Mode, the speed will be reset to 1/250 when the shutter button is pressed. In fact, even if you turn the ETTL feature off, the G9 will reset from 1/500 to 1/250 shutter speed.

Even worse, ETTL was not in control of the 580EX when that last picture was taken. It was a fortunate coincidence that full 580EX power bounced from the ceiling was about right. ETTL flash control does not work when the Canon G9 is in Manual Mode. The output power of a Canon flash mounted on the G9 must be adjusted either on the G9 or on the flash when the G9 is in Manual Mode. I don’t like it but that’s the way it is -- same on all the G series cameras.

(Note: All pictures above were downsized from the unprocessed in-camera jpg for consistency. Some prefer a slightly overexposed outdoor view to preserve the effect. See the Strobist blog for many more variations on this idea.)

Monday, November 26, 2007

G9 Pre-flash

In yesterday's post, I should have noted that there are problems when using inexpensive auxiliary optically triggered flashes with Canon main flashes in ETTL flash mode.

With optically triggered auxiliary flashes, it is important to know that Canon main flashes emit a "pre-flash" as part of the Canon ETTL system. Most auxiliary flashes are highly likely to be triggered by the pre-flash; this includes the in-camera flash of the G9. Therefore, it is essential to set the G9 for manual flash in order to properly trigger the auxiliary flash. My Quantaray MS-1 falls victim to the Canon pre-flash in every mode except for Manual.

Yesterday's post has been edited to include the above note.