Showing posts with label saturation. Show all posts

Thursday, December 11, 2008

Snow Day

.


Snow does not often come to south Louisiana but today we had about three inches of snow at my house. Our roads and systems aren’t built for snow and the disruption was considerable. Our local news featured “Snow Day” and even the national news mentioned snow in Louisiana.

Before the snow melted (yes, it’s all gone now), I grabbed a few shots to record the occasion. I especially liked the shot above. It was taken with my G9 in raw mode at ISO 400, 1/80 sec, f4.8. The sky was still overcast and the colors a bit drab so I punched up the saturation during processing.

.

Thursday, June 12, 2008

G9: Focusing with a Polarizing Filter

.
The title of this post is somewhat misleading. When the G9 is fitted with a polarizing filter, the focusing process does not change. Also, either linear or circular polarizing filters can be used on the G9. In fact, this is the entire point of this post.

Although filters were extensively used in film based photography, digital editing has significantly reduced the need and use of filters. Even so, a polarizing filter can be a great asset. This filter can pump up the colors, make the sky more blue, knock out the glare, etc. Many believe that a polarizing filter provides the only effect that cannot be simulated in the digital editing process. In a previous postings, the effects of a polarizing filter, graduated neutral density filter and various post processing effects, including HDR, were compared.

A polarizing filter was the second filter I ever bought (the first one was a clear, protective filter). Although I didn’t know it at the time, that polarizing filter was a linear type. Years later, my auto focusing (film) SLR required a circular polarizer. That was the first I’d heard of a circular polarizer. For a long time, I thought all auto focusing cameras needed a circular polarizer. A few years ago, I bought a circular polarizer for my Canon G3. For my G9, I still use that circular polarizer but I’ve since learned that a linear polarizer also works on the G9.

Once again, Wikipedia to the rescue for the details about polarization but be sure to scroll towards the end of the highly technical article. Also, that article does not really cover linear vs circular for photography.

It turns out that DSLR cameras and digicams like the G9 use different focusing systems. As mentioned previously, the G9 (and, I think, most digicams) use contrast detection as the basis for focusing whereas DSLRs use phase detection. As a result, the G9 can use a linear polarizer but DSLRs require a circular polarizer. This differentiation is often confused. The linear polarizer is less expensive but if you have, or intend to buy, a DSLR, the circular polarizer is more versatile.

To fit any filter to the G9, an adapter is needed (well, you can actually just hold the filter in front of the lens). In addition to selling the adapter, Lensmate sells polarizing filters and notes that either linear or circular types will work with the G9.

As final proof, I compared my 40 year old linear polarizing filter to my newer circular polarizing filter and found no obvious differences. The G9 worked fine with either. Nothing like a simple test to prove something to yourself!
.

Monday, February 4, 2008

Fine Tuning the G9 JPEG

.


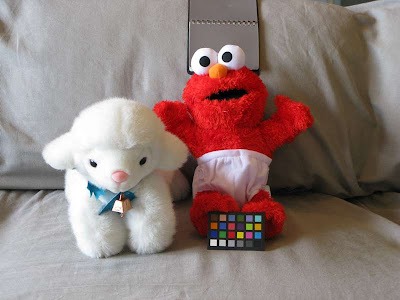
A lot can be learned with a simple setup. The above image of Elmo and Kitty-Cow is a good example. Sure, if you’d happened upon this scene, you’d probably fire away on full auto (and get a flash photo) but a more methodical process can be very educational. In particular, I wanted to try my hand at fine tuning the in-camera JPEG settings. Besides, this was a chance to use the new cable release as well (worked great).

The above scene was lit with mixed lighting: sunlight through a window at left plus direct overhead tungsten. What is the correct white balance setting? I tossed in a old gray card for reference.

What about exposure? Light meters assume neutral gray but a Kitty-Cow is white (there are black kitty-cows but, technically, these are bear-dogs). The couch is nearly neutral and Elmo is, of course, quite colorful. I often begin a shoot in aperture mode (Av) and use the camera as a light meter. With the G9 at ISO 100, Av mode at f4.8, zoomed out all the way and set for spot metering, the “correct” exposure varied a lot as I panned over the scene. Kitty-Cow wanted 1/15 second; Elmo 1/4; the couch 1/6 and the gray card 1/5. So this is a good example of how a white object affects a light meter reading: about 1 to 2 stops off. Shifting to Program mode (P) and using evaluative metering on the complete scene, the G9 would like to take this picture at 1/13 second and f3.5. This (Program and evaluative) exposure is essentially the same as that obtained by metering the gray card or couch. In practice, I find evaluative metering to be very good so my G9 is almost always in evaluative metering mode.

What about the white balance for this mixed lighting? Using the G9 white balance options, I made two custom white balances: Custom1 was based on the gray card; Custom2 was based on the couch. Later on, based on a raw file, Photoshop said that the G9 auto white balance was at 4100K with +4 tint. Photoshop preferred 3950 and 0 tint in its own auto mode. According to Photoshop, my G9 Custom1 is at 3900, -13 whereas Custom2 is at 4200, -6. Again, later on, looking on a calibrated monitor, I preferred Custom2; however, I did most shooting in automatic white balance.


Next, I “softened” the G9 settings by minimizing the contrast, sharpening and saturation. The result is as expected. These minimums are popular starting points when the JPEG file is to be post processed. This image is downsized to 50% and cropped so that some details can be checked (click for larger image).

Finally, I went to the extreme settings for contrast, sharpening and saturation. This image is downsized and cropped as above. One unexpected result was the file size. Using the “normal” settings, the file size was 4 KB; the file size for the soft, desaturated image was 3.4 KB; the file size for the extremes was 4.5 KB. Otherwise, the results are as expected but at least now I have some feeling for those extremes.

On examining the files in BreezeBrowser and Photoshop, I was surprised that none of the special My Colors settings were retained in the file data. So if you try similar experiments, be sure to take notes.
Although all went smoothly, it seemed strange to be making these changes in-camera. I never shoot this way so I was constantly checking and fiddling with the camera to set, unset, reset, etc. My own preference is still to shoot in raw mode and make such adjustments in postprocessing.

.