Showing posts with label JPEG. Show all posts

Wednesday, March 14, 2012

G1X: A Short Walk

Short Walk

As the weather was very nice today, I found it convenient to take a short walk outside and slipped the G1X into my pants pocket* to grab a few shots along the way.  Nothing particularly great about these shots; the G1X was in Av mode, JPEG only, ISO 100 or 400.  Exposure compensation was used to tweak the Av exposure – sometimes based on the histogram but more often as an adjustment for a second shot.  Exposure compensation for the above shot was +1/3.

Short Walk

As a measure of my humility, the above flower shot just didn’t work as I thought it might.  No exposure compensation.  My idea was to focus on the foreground and have the middle and background fade to extreme blur.  The largest aperture for that focal length was f5 and it simply was not enough.  Probably needed more like f2.

Short Walk

Staying with 16:9 aspect ratio, the above shot (which I call “Tree and Clouds”) was at full telephoto and f5.8.  No exposure compensation.

Short Walk

Back to a 4:3 aspect ratio above.  No exposure compensation.

Short Walk

I get tired of people taking pictures of ducks.  These are geese.  Taken using the 1.9x digital zoom feature.  No exposure compensation.

Short Walk

Staying with the 1.9x digital zoom but –2/3 exposure compensation.

A nice walk with a little photo practice along the way.


* Said pocket being styled and designed for men of a certain age.

Sunday, March 4, 2012

G1X: Rural Life Museum

G1X Rural Life

The Rural Life Museum is one of my favorite places to try out new cameras, photo equipment and techniques.  Today, while practicing with the G1X, I received an added bonus:  No Senior Citizens discount!  In fact, I was not even asked!  That dollar seemed insignificant to me as I decided to pay the full fee and feel years younger.

G1X Rural Life

I shot with the G1X naked (no, not me, the camera!) meaning without a tripod, flash, filters, no RAW mode, no editing, no post processing.  This forced me to use high ISO settings along with whatever the G1X had to offer.  Unlike some of my first G1X attempts however, I did change take multiple shots and varied exposure and other settings in my attempts to get the picture that I wanted.  So the pictures in this post are Straight-Out-Of-Camera (SOOC) – even if I took several at various settings and discarded all but the one posted.

G1X Rural Life

G1X Rural Life

Instead of cropping, I sometimes changed the aspect ratio in-camera.  In practice, I believe in cropping.

G1X Rural Life

G1X Rural Life

G1X Rural Life

G1X Rural Life

I have a definite tendency to shoot vertical (portrait) pictures. In fact, my favorite shot of the day is a vertical, shown below.

G1X Rural Life

This exercise (JPEG only, no editing) was a good one.  I still plan to (mostly) shoot in RAW and post-process to taste but SOOC definitely has its place.

Saturday, March 3, 2012

G1X: JPEG Variations

HannahAs promised by the weatherman, today was rainy, overcast and cooler than I wanted.  Instead of searching for a scene to turn into a work of art with my new G1X, I decided to test variations of its in-camera processing.  Normally, I prefer to shoot in RAW mode which means that each shot is considerably post processed in Photoshop following conversion from Canon’s RAW format in Adobe Camera Raw (ACR).   There is no doubt in my mind that shooting RAW ultimately yields the best print – especially for me.  Even so, there are advantages, particularly in economy of time, to using the so-called Straight-Out-Of-Camera (SOOC) image. 

Although some still talk as though the Straight-Out-Of-Camera image is the only truth, SOOC is actually misleading.  Modern digital cameras include a number of image adjustments – sort of an internal Photoshop.  When shooting in JPEG (only) mode, the G1X allows adjustments in color saturation, contrast, sharpness and individual color adjustments to red, green, blue. There are also dynamic range adjustments to both highlights and shadows.   In addition, the G1X offers a number of effects such as HDR, B/W, Sepia, etc. which were not included in today’s testing.

I coaxed Hannah and her friend into posing even though it was still cool outside and quickly set up this attractive composition to include several colors and distances.  The sky, though, remained overcast with resulting soft lighting.  The first photo of this post was made with all “normal” settings in JPEG format shooting in Av mode at ISO 400.  That is, SOOC.

HannahHere’s a shot with saturation, contrast, sharpness and red turned down one notch in the “My Colors” menu.  Such settings are sometimes recommended by photographers who do not use RAW format but still tweak the files in various photo editing software.  I was surprised to see so little variation between this image and the “normal” (first image shown) image.  The differences are visible in the full size files on my screen but probably are not so apparent here.  I don’t like this variation.


HannahThis shot is the near opposite of the above “turned down” image; call it the “turned up” image with contrast and sharpness turned up one notch but saturation normal and red still turned down one notch.  Looking at the “turned up” and “turned down” images, I hope the difference in contrast is apparent even if the difference in the other parameters is not.  I actually like this one but have a tendency to overdo both contrast and sharpness (and I’m not the only one!).


HannahNext is a shot taken with all settings “normal” except that highlight and shadow recovery (Dynamic Range) have been forced to maximum.  I don’t like this one; it looks washed out with low contrast.  The problem (I think) was that the overcast sky prevented bright highlights and dark shadows from occurring in the first place.  When Dynamic Range Improvement was set to “Auto” the result(not shown) was essentially the same as a “normal” picture thus indicating that Dynamic Range Improvement was not significantly applied.  I need to test this feature further but, for now, my thinking is to be sure to use RAW image mode when highlights and shadows are strong.

My conclusion?  I’ll be leaving all the “My Colors” settings at “normal” with the possible exception of Red saturation.  If I’m to do post processing of image files then I might as well shoot in RAW to begin with.  This is a convenient conclusion because the “My Colors” adjustments do not apply when shooting in RAW+JPEG and most of my JPEG shots are produced via the RAW+JPEG combination.  If I were down to the last Gigabyte of the memory card and forced to switch to JPEG only then I’d set “My Colors” for Red turned down one notch and would also think about using Dynamic Range Improvement.  In such a case, I’d probably turn down the sharpness as well in anticipation of tweaking the JPEG file myself. 

Straight-Out-Of-Camera?  What are the camera settings?

Monday, April 13, 2009

Raw or JPEG?

.
Photography is so useful, so interesting and the new digital cameras so powerful and intriguing that photography forums on the Internet are constantly being visited by newcomers. Naturally, many of these new or upgraded photographers ask the same questions. One such question – especially for those who wish to become a bit more serious about photography – is “Should I shot in JPEG or Raw?” However innocently the question is asked (and it is not always innocently asked), the asking is like poking a stick into a hornet’s nest. Raw vs JPEG is an ongoing debate that is apparently irresolvable to many but obvious to some.

The JPEG delivered by our cameras is post processed from the raw data in-camera. Some of the in-camera post processing parameters can be tweaked a bit to suit personal tastes. Certainly the in-camera JPEG can be a fine picture and it is used by many (most? almost all?) photographers. Just as certainly -- in fact, absolutely -- the JPEG contains less information than the original raw image file because the JPEG is post processed and lossy compressed to an 8 bit basis from that 12 bit (Powershot G series) raw "negative".

Whether an individual can make a "better" picture from raw than the Canon software engineers (as directed by Canon marketing) do from the in-camera JPEG is a function of their own skills and available time. If someone tells me that they can make a better picture from raw than is delivered by the in-camera JPEG then I believe them. But when someone tells me that they cannot improve on the in-camera JPEG then I believe them as well. I even believe those who say that their post processed picture from the in-camera JPEG is better than their post processed picture from raw!

There is a place for both the in-camera JPEG and post processed raw images. Think about how you intend to use the camera and your pictures. For snapshot sized prints, computer monitor sized images and even HD-TV sized images, it probably does not matter a lot whether you use the in-camera JPEG or post process your own from the raw file -- especially if you select the correct white balance, get the exposure right and have tweaked the in-camera adjustments ("My Colors") for the JPEG to your own tastes. On the other hand, if your goal is a large print (say, 12x18 inches), if you've been forced to use a high ISO or if you choose to crop significantly then you should consider shooting in raw. Also, raw image files are somewhat more forgiving because exposure and white balance can be adjusted during conversion of the raw file (I know, I know … get it right the first time, etc., etc.)

I almost always get a raw image file from my G9. Sometimes I shoot in raw only and sometimes using raw+JPEG. I rarely shoot JPEG only. I'm not a pro; there are pros shooting raw and pros shooting JPEG. I'm glad that we have a choice.
.

Sunday, October 12, 2008

G9: Sky at ISO 800

.


.
In a previous post, I noted that I was placing some large images in a Smugmug gallery for purposes of comparison. Those first images were taken at ISO 100, 400 and 800. Both the in-camera JPEG and a raw image file were posted. A subtle difference for those first six shots of the sky is that all were slightly underexposed. The last two shots (#7 and #8) were made “just right” by increasing the exposure by +2/3 stop as compared to the evaluative metering mode of the G9. Now to examine an ISO 800 “just right” image and compare the noise to the slightly underexposed variation.

The image above is the ISO 800 in-camera JPEG that was underexposed by 1 stop in the bracketing process. This means it was actually underexposed by 1-2/3 stops in comparison to the "correct" exposure.

The images to be compared are the new Smugmug images #9, 10, 11, 12. These are the bracketed versions (+/- 1 stop) of images #5 and 6. Image #9 and 10 are the in-camera JPEGs and images #11 and 12 are the processed raw versions of #9 and 10 respectively. In particular, notice that image #12 has much less noise that image #11 and even less noise than image #6. The apparent reduction in noise is actually because much less noise is generated when the exposure is correct. In fact, this was the entire purpose of this little exercise: Minimize noise by avoiding underexposure.


.

Saturday, September 13, 2008

G9 File Size

.
The image produced by the G9 is 4000 pixels x 3000 pixels for a total of 12 million pixels. We say that the G9 is a 12 megapixel camera; I usually write this as 12 MP. So a G9 image file would be 12 megabytes (MB), right? Well, not necessarily and probably never exactly.

The in-camera JPEG file produced by the G9 is roughly 5 MB in size for the “Large, Superfine” description. Page 261 of the G9 manual gives estimated file sizes for the various JPEG and RAW settings but these are only estimates. The file sizes are smaller than might be expected because, as noted previously, JPEG files are not only compressed but also are lossy; that is, some data is discarded during the compression process. The results of the mathematical algorithm for lossy compression vary with the content of the image file. In other words, file size varies with the picture so you never know the file size until after the picture has been taken.

To see for myself how the file size varies, I put my G9 on a tripod and photographed a mundane scene of my messy bookcase – which you will not get to see. I set the G9 on Large, Superfine JPEG, wide angle, manual exposure at 1/10 second, f2.8, auto white balance and took 22 pictures. Why 22 pictures? Well, I varied the contrast, sharpening and saturation for every picture. File sizes ranged from 4561 KB to 5741 KB. Remember: the scene and lighting was identical for each picture.

Using My Colors, I varied the Custom Color setting for contrast, sharpening and saturation. For those settings, considering the mid-point (“Normal”) as being zero (0), I took pictures at the low extreme, the Normal and the high extreme; I think of these settings as being -2, 0, +2. Here are some examples of files size:

Cont Sharp Sat Size, KB
0 0 0 5142
-2 -2 -2 4596
-2 -2 0 4561
-2 0 0 5070
0 +2 0 5532
0 0 +2 5265
+2 +2 +2 5565
-2 +2 +2 5741

In comparison, a RAW file was 13,600 KB and the accompanying JPEG at Large+Fine (not Superfine) was 3089 KB when the settings were 0, 0, 0.

A quick linear regression analysis shows that the amount of sharpening has the most significant effect on file size, followed by saturation. Contrast has the least effect on file size. (Note: The linear regression does not provide an exact match. It predicts the smallest file size at -2, -2, -2 and the largest at +2, +2, +2; however, the correlation is pretty good.)

My explanation? Sharpening tends to increase apparent detail and those details – whether real or not – are not as compressible. I was a little surprised by the effect of saturation and contrast. I actually thought that reduced saturation and contrast might increase the file size but this was not the case. Finally, there is a cross correlation between these three variables but it is not very significant with regard to file size.

My conclusion? I still shoot mostly in RAW mode. When I do shoot in JPEG, I usually leave the contrast, sharpening and saturation at “Normal” but this is more of a convenience than a strong preference.
.

Friday, June 27, 2008

G9: Focusing Indoors

.
As previously noted, although the G9 has five automatic focusing modes, I almost always choose the small Flexizone frame centered in the LCD. I place the focus frame on the subject of interest, push the shutter button halfway, think “focus”, check for the frame to turn green, recompose the scene and finish pressing the shutter. To get additional shots from the same vantage point, I then switch to manual focus and keep the previous focus distance. This method almost always works well even if it is a bit slow and methodical.

Without recomposing, the small Flexizone frame may not detect enough contrast to obtain focus. Also, without recomposing, the small Flexizone frame may focus on the wrong object. This is particularly a problem when photographing indoors. To illustrate this problem, I set up my G9 on a tripod and tried the various focusing methods indoors.

In this scene, the G9 was set for the widest angle, 7.4mm; the aperture was f4.5 (the “Sweet Aperture”) . The image shown was downsized from the in-camera JPEG. The focus distance, as determined by the small Flexizone frame was 15 feet but the large Flexizone frame determined the focus to be 8 feet! This discrepancy occurred because the small frame fell on a photo on the opposite wall but the large frame included a chair. The focus distance, as determined by the small AiAF matrix was 12 feet. The large AiAF matrix also determined the focus to be 12 feet. Interestingly, the large AiAF matrix did not always lock onto the same object even though the G9 was on a tripod. I had suspected that the different focus methods would lock onto different objects and I was correct.

Using manual focus, I dialed in 5 feet and took another shot. Later, to my surprise, all the pictures look essentially the same. Why? Of course, the explanation is hyperfocal distance. For the 7.4mm zoom focal length and f4.5 aperture, everything from about 4 feet to infinity is in acceptable focus. In setting up my test, I’d forgotten about the hyperfocal distance. Chalk one up for the G9.

Since this humbling experience, I’ve toyed with the various focus modes quite a bit. My basic hypothesis was correct: With any focus mode other than the small Flexizone frame, I cannot be certain of getting the exact focus point that I want. Fortunately, often it just doesn’t matter.

But sometimes it does .... (more later)
.

Monday, February 11, 2008

G9 and Raw

.
Unlike most digicams, the Canon G9 can produce “raw” files. For many photographers, the ability to generate a raw file is one of the main reasons for selecting the G9. Even so, the usefulness and quality of raw vs JPEG is an ongoing debate and probably will always be an issue. As noted in other postings, JPEG is a very versatile and useful format. For the most part, the raw vs JPEG debate is really about the in-camera JPEG and its potential as compared to the raw – that is, unprocessed -- data from the sensor

If the in-camera JPEG produced by the G9 is analogous to using slide film then the raw image is analogous to using negative film. That’s why a raw file is sometimes referred to as a digital negative. Both negatives and raw files must receive further processing before a print can be made and those prints are highly customizable as well as highly dependent on the tools and skills of the user. This image, a crop from a previous illustration, is an example of an unprocessed raw file.

In comparison to the 8 bit JPEG, raw files are 16 bit data files; however, it turns out that all those bits are not actually used. For example, the Canon G9 produces 12 bit data files but places those in a 16 bit “wrapper”. Still, there is more information in a G9 raw file than in a G9 in-camera JPEG file. Although file size can be misleading (both are compressed), take a look at raw and JPEG files. Information has been discarded from the raw file in order to create the smaller JPEG file.

It is important to understand that the in-camera JPEG is made from the raw data in a second or two (and perhaps a fraction of a second) by the in-camera computer. The details of that JPEG -- tonality, contrast, saturation, sharpening, noise reduction, etc. -- were determined by a committee of marketers and engineers except for any tweaking that you toss in as in-camera options.

If your goal, whether in general or for a particular photograph, is to squeeze every possible pixel of quality from your camera, then you should shoot in raw mode and learn to process the raw data file.

My own preference is to shoot in raw mode and to process the raw file in Photoshop (more accurately Adobe Camera Raw – usually abbreviated as ACR). There are several other editing/conversion programs that will work with the G9 data files. Canon even includes some software, Raw Image Task (RIT) with the G9. Some of the other G9 raw image processors, include:

DCRaw is a command line program/module said to be the basis of many other programs
UFRaw provides a user interface to DCRaw and adds features
Bibble is more than raw conversion, includes other features such as noise reduction
BreezeBrowser is one of my most used tools, but it has not yet been updated for G9 raw files.

I don’t use any of the above programs for raw conversion except for ACR. In the next post, I’ll give examples of starting point settings in ACR for G9 raw files.

.

Monday, February 4, 2008

Fine Tuning the G9 JPEG

.


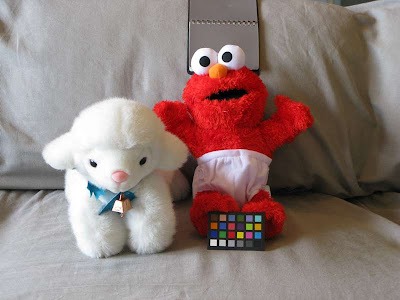
A lot can be learned with a simple setup. The above image of Elmo and Kitty-Cow is a good example. Sure, if you’d happened upon this scene, you’d probably fire away on full auto (and get a flash photo) but a more methodical process can be very educational. In particular, I wanted to try my hand at fine tuning the in-camera JPEG settings. Besides, this was a chance to use the new cable release as well (worked great).

The above scene was lit with mixed lighting: sunlight through a window at left plus direct overhead tungsten. What is the correct white balance setting? I tossed in a old gray card for reference.

What about exposure? Light meters assume neutral gray but a Kitty-Cow is white (there are black kitty-cows but, technically, these are bear-dogs). The couch is nearly neutral and Elmo is, of course, quite colorful. I often begin a shoot in aperture mode (Av) and use the camera as a light meter. With the G9 at ISO 100, Av mode at f4.8, zoomed out all the way and set for spot metering, the “correct” exposure varied a lot as I panned over the scene. Kitty-Cow wanted 1/15 second; Elmo 1/4; the couch 1/6 and the gray card 1/5. So this is a good example of how a white object affects a light meter reading: about 1 to 2 stops off. Shifting to Program mode (P) and using evaluative metering on the complete scene, the G9 would like to take this picture at 1/13 second and f3.5. This (Program and evaluative) exposure is essentially the same as that obtained by metering the gray card or couch. In practice, I find evaluative metering to be very good so my G9 is almost always in evaluative metering mode.

What about the white balance for this mixed lighting? Using the G9 white balance options, I made two custom white balances: Custom1 was based on the gray card; Custom2 was based on the couch. Later on, based on a raw file, Photoshop said that the G9 auto white balance was at 4100K with +4 tint. Photoshop preferred 3950 and 0 tint in its own auto mode. According to Photoshop, my G9 Custom1 is at 3900, -13 whereas Custom2 is at 4200, -6. Again, later on, looking on a calibrated monitor, I preferred Custom2; however, I did most shooting in automatic white balance.


Next, I “softened” the G9 settings by minimizing the contrast, sharpening and saturation. The result is as expected. These minimums are popular starting points when the JPEG file is to be post processed. This image is downsized to 50% and cropped so that some details can be checked (click for larger image).

Finally, I went to the extreme settings for contrast, sharpening and saturation. This image is downsized and cropped as above. One unexpected result was the file size. Using the “normal” settings, the file size was 4 KB; the file size for the soft, desaturated image was 3.4 KB; the file size for the extremes was 4.5 KB. Otherwise, the results are as expected but at least now I have some feeling for those extremes.

On examining the files in BreezeBrowser and Photoshop, I was surprised that none of the special My Colors settings were retained in the file data. So if you try similar experiments, be sure to take notes.
Although all went smoothly, it seemed strange to be making these changes in-camera. I never shoot this way so I was constantly checking and fiddling with the camera to set, unset, reset, etc. My own preference is still to shoot in raw mode and make such adjustments in postprocessing.

.

Friday, February 1, 2008

G9 and the In-Camera JPEG

.
The G9 can create its own JPEG; I’ve taken to calling this the in-camera JPEG.

The G9 in-camera JPEG can make quite a nice picture and is very convenient. It can even be customized and fine tuned through the G9 options. I sometimes think of the in-camera JPEG as being analogous to a slide made with transparency film. A particular type of film would be purchased to match the conditions and purpose of the photo shoot; for example, a high speed, outdoor (sunlight) film having saturated colors and high contrast. When shooting in-camera JPEGs, you can, in fact should, make such adjustments. To many photographers, this is only natural. Alternatively, the G9 can and will do this for you.

When the G9 is set on full (green) Auto mode, all adjustments are made for you. In fact, you can’t change the settings for color saturation, contrast, etc. In order to fine tune the G9 JPEG to suit your own tastes, you’ll have to shoot in either P, Tv, Av or M mode – the “creative” modes.

When fine tuning or customizing the G9 image settings, the first decision to be made is about the lighting – or rather the light source. With the G9 in either P, Tv, Av or M mode, press the Func button to get to the various options. The very first option, top left on the LCD, probably shows “AWB” for Automatic White balance unless you’ve already changed it. Across the bottom of the LCD screen, is a picture of the sun, a cloud, etc. Scroll through these and pick the one that seems to match your setting and light source.
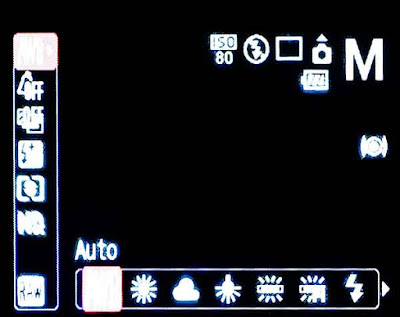
The options just below the white balance (light source) setting are labeled “My Colors”. These are very popular adjustments. The default setting is “Off” (as shown in the first image) but along the bottom of the LCD screen you’ll see options for increasing saturation (“Vivid”), decreasing saturation (“Neutral”), and many more. The very last option, “Custom Color” offers the most flexibility. By selecting “Custom Color” and then pressing the Display button, you’ll have access to fine tuning the contrast, sharpness, saturation, red, blue, green, and skin tone. It may take some tinkering to find the settings that you like. In all honesty, I’ve never used these features.

Even though a JPEG image has been sort of condensed from the full data set collected by the sensor, JPEGs can be edited. Many photographers who routinely edit their JPEGs seem to set their cameras for slightly less contrast, less sharpness, and less saturation. If necessary, these parameters can be fine tuned later during the editing process.

In a future post, I'll show some comparisons of in-camera JPEGs using the default and adjusted settings.
.

Sunday, January 27, 2008

An Overview of JPEG

.
A previous post introduced the basic ideas of raw and JPEG image files. This post is about JPEG. I’m no expert on JPEG so my understanding and the following explanation is probably an oversimplification but, even so, may be a useful starting point for many new photographers.

Most of the pictures that we see every day were made from JPEG files. Almost every picture on the Internet is a JPEG. The photo sharing websites require or prefer JPEGs. The local discount digital photo printshop requires JPEGs. Many photo contests and online galleries require JPEG files. Your digital camera – even if it is an expensive DSLR – shoots JPEGs and probably defaults to JPEGs; in fact, your digicam may shoot only in JPEG mode. Photojournalists are likely to be required to shoot in JPEG mode. The micro-stock agencies post JPEG images for downloading. So, what is a JPEG?

Instead of going into the full definition of JPEG with all the mathematical details and possible variations, for our purposes there are three important features of a JPEG file: 1) JPEG is a data file for storing digital images, 2) JPEG is an 8 bit data file and 3) JPEG is a lossy data file.

In computerspeak, current digital cameras can capture 10, 12 or even 14 bits of information from every pixel. When this captured information is to be stored in an 8 bit data file, some of it must be discarded. Even without going into all the details of “bits” the intuitive conclusion is correct: A JPEG data file does not contain all the information originally captured by the camera. This is troublesome to some people; however, monitors and printers are actually 8 bit devices.

Instead of storing all the 8 bit data, the size (and quality) of the JPEG data file is further reduced by discarding data that might not be noticable to the human eye or interpretation. This is called “lossy” compression and is an ingenious method of reducing file sizes. Before the image is saved to the JPEG data file, a “quality” is specified. At the highest quality, very little data is discarded. In Photoshop, JPEG quality is specified from 1 (lowest quality) to 12 (highest quality). The first image shown in this posting was saved at a Photoshop quality of 1; its file size is 34 KB. This image was saved at 6; its file size is 70 KB (click for a larger image). These images are 100% crops based on the in-camera JPEG taken at the same time as this previously shown raw capture from this photo.

Obviously, a JPEG image file is extremely useful. We all benefit from JPEG. In the next posting, I’ll give an overview of the JPEG image files and options for the Canon G9 .

.

Wednesday, January 23, 2008

G9: In the Raw and/or JPEG

.
Shortly after pressing that shutter button, the internal computer chip in your digital camera begins to process the data collected by the sensor and then saves that data as a “picture” in the form of a data file on the memory card. Most likely, that data file is either a JPEG or a raw file format. JPEG is an acronym for Joint Photograpic Experts Group . JPEG files have “jpg” as the filename extension; for example, myfile.jpg is the filename of a JPEG image. Whereas JPEG files follow international standards, a raw file is proprietary to the particular camera manufacturer according to their needs. Therefore, many devices have software to read and process JPEG images but few can deal with raw images because all the raw image files are different.

In the case of the Canon G9, the raw image files have the filename extension cr2; for example, myfile.cr2 is (probably) a Canon raw image file. However, just because the filename has the .cr2 extension does not necessarily mean that it came from a Canon G9 camera because all the current Canon cameras having raw capability save their raw images with a cr2 filename extension. My G3 used a crw filename extension.

So, what’s the difference between JPEG and raw and why worry about it? Well, there is – or can be – a lot of difference but you don’t have to worry about it unless you want to. On the other hand, if you are concerned about maximizing image quality, developing a personal or customized look and generally pushing the limits of photography, then you should learn to process raw image files. The raw image file is sometimes described as the digital version of a (film) negative whereas the JPEG image coming straight out of the camera is more like a machine processed print from that negative. Although debatable and not strictly true, this description and comparison is easily understood. This picture is a 100% crop (click for larger view) from the raw file of a previously used scene; it has had no (as far as I can tell) post processing. Kind of ugly, fuzzy and noisy, isn't it?

It is very important to realize that your camera makes its JPEG from the raw data in about a second or so. I call this image the "in-camera" JPEG. You can make your own JPEG from the raw file by using any editor that can read the proprietary raw file. This is what I do; of course, it takes me quite a bit longer than one second. So, most of the time, my final product is a JPEG file and, for my best efforts, a print made from that JPEG file.

One advantage of learning about raw image processing is that you are then entitled to participate in the endless debates about whether raw or JPEG is “best” or, for that matter, even worthwhile. In the great raw vs JPEG debate, when someone states that they've thoroughly investigated, studied and tested to come to the conclusion that JPEG is "good enough" or that their own JPEGs are "as good as" their own raw post processed images then I believe them. When someone states that they get better results using raw and post processing (my own experience) then I believe them as well.


(This is another post that will be continued and also used as a reference and link).
.