Showing posts with label RF-602. Show all posts

Wednesday, August 14, 2013

Meyin RF-604

Meyin RF-604RX

The Meyin RF-604, a wireless flash trigger, first got my attention because of its name.  I assumed that this was a new product evolved from the Yongnuo RF-603.  I’m probably not the only person mislead by the name.  The “RF-604” is not a Yongnuo product but it sure appears to be an evolved version of the Yongnuo RF-603.

Although it was the product name that caught my attention, it was the locking wheel that caught my eye and convinced me to buy one.  (The Yongnuo RF-603 does not have a locking wheel and fits loosely to the camera hot shoe.)

Meyin RF-604RX

The Meyin RF-604 is somewhat larger than the Yongnuo RF-603 and 602.  So, far the RF-604 appears to be compatible with both.

Meyin RF-604RX

I’ll have more to say about the RF-604 after I’ve exercised it a bit.  So far, so good.

Meyin RF-604RX on G1X

Monday, October 8, 2012

RF-603 PC Connection

RF-603

In addition to the hotshoe and shutter connections, the RF-603 also has a threaded (“screw lock”) PC connection at the squared off end of the body, see above.  (In the world of photography, “PC” once meant Prontor/Compur and not “Personal Computer”.) The intent of the PC connection is to connect to flashes that do not have a hotshoe. My set of  RF-603s did not include PC connection cables so I ordered some from eBay (search for “Male to Male Flash PC Sync Cable Cord for Yongnuo RF-603” – can’t get much more specific than that!). My order was placed with “Jiakgong” in China. These cables were less than $3 each so I ordered 4 cables. Shipping was only $1.40; seems like it took about two weeks to receive the cables. The cables were loosely packed with no documentation but seem OK and I gave positive feedback on the transaction.

RF-603 PC

The eBay cables indeed fit the RF-603 – first test passed. Next, I wondered if the RF-603 could trigger two flashes in the same way that worked for the  RF-602. The trick with the RF-602 was to use one flash in the hotshoe and connect the second flash with the cable. I tested this configuration with two old Nikon SB-24 flashes, the RF-603 and the PC cables as shown below.

RF-603

It works!

RF-603

Thursday, September 13, 2012

Yongnuo RF-603

RF-603The Yongnuo RF-603 is a wireless system for triggering flash and/or camera shutter using the FSK 2.4 GHz channel. Control distances up to 100 meters are claimed. Transmitter and receiver are identical and are called transceivers. The transceivers are powered by two standard AAA batteries; 45 hours of standby are claimed. Sixteen channels are available to provide isolation from other RF-603 that might be nearby.

RF-603

The RF-603 is offered as the RF-603C for Canon cameras and RF-603N for Nikon cameras. I’ve not seen the Nikon version but apparently there are slight electronic differences in addition to differences in the hot shoe and cable connections. The Canon version uses a 2.5mm socket for connection to the camera and a standard PC socket for connection to studio flashes. On the camera end, the connecting cable varies according to the camera connection. Cameras such as Canon’s 1D, 5D, 7D, 20D use the “C3” cable whereas the 60D, 450D, 1000D and similar use the “C1” cable. My G12 and G1X also use the “C1” cable.
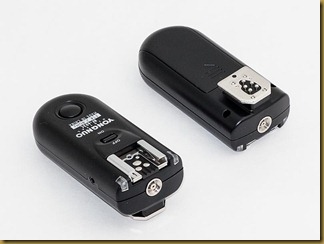
RF-603

The RF-603C came well packed and worked right out of the box. I must admit that, at first, I thought the triggers were defective because I immediately mounted a flash to the hotshoe of a transceiver and tried to trigger it by pressing the button on the other transceiver. The RF-603 doesn’t work that way. It turns out that pressing the transceiver button does not activate the hotshoe on another transceiver. The button activates the shutter release connection – not the hotshoe connection on the receiving transceiver. As a flash trigger, the RF-603 can be tested by mounting the flash to the hotshoe of one transceiver, placing the other transceiver on the camera hotshoe and firing off a shot.

Channel selection is done by setting the switch that is beneath the batteries.  I immediately changed the channel from the factory setting.  Each transceiver must be set to the same channel.

RF-603

Here’s a funny about the RF-603 package: The box has dual labels in English and Chinese (I assume). The User Manual is also in English and Chinese. Inside the box was a small package of desiccant label “DO NOT EAT” – but only in English!

Prior to getting the RF-603, my preferred remote trigger was the RF-602 although I first learned about remote flash triggers by using the Cactus V2. The Cactus V2 had an iffy performance that seemed mostly related to connections and wiring. After getting the RF-602, I stopped using the V2.

So far, I’ve not seen much difference in the performance of the RF-603 as compared to the RF-602 when used as a simple flash trigger. I had hoped (in vain!) that my G1X fitted with the RF-603 might not exhibit “screen blanking” as it did with the RF-602. However, this is obviously more of a problem (or undocumented feature) with recent PowerShots than it is related to the specifics of the flash accessory.  The RF-603C worked fine with my 7D.

RF-603

Compatibility-wise, the RF-603C seems to trigger every flash I have access to – even the Nikon SB-28 and SB-24. Remember though, that all the RF-603 does is to signal “Fire” to the flash. The flash power must be set manually on the flash. It appears that the RF-603 cannot be triggered by the RF-602 and vice versa.

RF-603

There are two main gripes about the RF-603:  First, the OFF/ON switch is virtually inaccessible after the flash is mounted to the trigger hotshoe.    This means that the trigger must be turned ON before mounting it to the flash.  Second, the trigger just slides into the camera hotshoe – there is no lock.  Although this friction only mounting is actually relatively secure, it does not fill me with confidence so I’ll be applying a bit of gaffer tape.

The RF-603 is very versatile and can be used in a variety of triggering modes but I’ll save those details for a separate post.

Friday, November 18, 2011

YN565EX and the G12

YN565EX with G12 and 580EX

The G12 and any large flash become an ungainly, but sometimes useful, combination.  In my introductory remarks about the YN565EX, I noted that it was not purchased for use on the G12 and implied that there were problems. Indeed, the YN565EX should be considered as incompatible with the G12; however, it does work on the G12 in certain modes. Let’s get the bad news out of the way first.

The YN565EX does not work at all – that is, does not even flash – when the G12 is in manual flash mode. This was completely unexpected. I expected some kind of odd ball behavior but it never crossed my mind that the YN565EX would not fire at all when mounted on the G12. Curious, I tried the YN565EX on my G9 only to find the same behavior (after changing batteries in the G9). Next, I tried the YN565EX on the G6 and G3 and discovered that the YN565EX is completely incompatible with those older G series cameras.

On the positive side, the YN565EX does work on the G12 when the G12 is in P, Tv or Av mode. The YN565EX zooms with the G12 zoom and Flash Exposure Compensation can be controlled either by the YN565EX or by the G12. The YN565EX seems to work in either direct or bounce orientation (I say “seems” to work because I did not attempt to check the accuracy of the flash exposure). Again, I’ll comment that the YN565EX is noticeably louder than the 580EX II when flashing. Also, to my eye, the YN565EX produces a more noticeable pre-flash when used on the G12. I would not be confident in using the YN565EX mounted on the G12.

But I didn’t get the YN565EX for direct mounting on the G12; I got it for use in the Canon wireless system. The G12 does not have its own internal wireless controller as does the 7D but the 580EX II can act as the master, or controlling, flash. My first attempts to set the 580EX II as the master flash were unsuccessful and I was beginning to think that the 580EX II was itself incompatible with the G12. Then I discovered that the G12 requires a menu setting to enable the Canon wireless system. As soon as the wireless system was enabled in the G12 menu, the 580EX II immediately became the master flash. Alas, the YN565EX did not respond to the 580EX II as a master when the 580EX II was mounted on the G12.

In my frustration, I got out a Canon 420EX and set it to slave flash mode using the same settings as the YN565EX. Side-by-side with the YN565EX, the 420EX responded to the 580EX II as expected but the YN565EX did not. More frustrated, I removed the 580EX II from the G12 and placed it on the 7D, noting that the settings did not change. When triggered by the 7D, both the YN565EX and the 420EX fired as expected -- end of compatibility tests.

Well, almost the end of compatibility tests. In optical slave flash mode, the YN565EX does respond to the G12 internal flash and also to the 580EX II when mounted on the G12.  The YN565EX also responds to the simple Yongnuo RF-602 wireless trigger. These are very useful features.

My conclusion is that although the YN565EX is not totally incompatible with the G12, it is best to declare the YN565EX as being incompatible and therefore avoid the frustration of attempting to remember which settings and modes work and which do not. I won’t be using the YN565EX with my G series cameras except as an optical slave flash or with the RF-602 trigger.

… but I’m still OK with having purchased the YN565EX.

Wednesday, December 29, 2010

G12 Bug: Self Timer Shutter Delay with Wireless Remote

.
Another flash related bug has shown up on the G12. Previously, I griped about the “screen blanking” that occurs when using a (non-Canon) wireless remote to trigger an off-camera flash. Even though the screen would go dark (indicating the manual exposure) with wireless remotes, at least the flash would be triggered. A recent discussion forum thread pointed out that the flash will not be triggered if the internal self timer is used to produce a shutter delay.

I tested my own G12 using Yongnuo RF-602 wireless remote triggers connected to off-camera Canon flashes. The RF-602 triggered the flashes (although the screen went blank) as expected unless the G12 self timer was used to delay the shutter.

The problem was also reported to occur with CyberSync CST remotes.

Apparently the mis-fire does not occur with Canon’s own STE-2 transmitter and Canon flashes.

A work around for self portraits is to add a second RF-602 transmitter and receiver (set to a different channel) along with the Yongnuo shutter connnecting cord LS-02/C1. I did this to get some Halloween pictures.

The G9 does not have this problem – something has changed in the G12 firmware. C’mon Canon, fix our G12s!
.

Monday, November 1, 2010

G12: Halloween

.


I couldn’t resist rigging up the G12 to grab a few Halloween shots. Because of low light (wouldn’t be Halloween otherwise, right?) the pictures would probably show a lot of noise and motion blur but that would be OK. Besides, these were just for fun.

Custom modes are great for saving the setup. I placed the G12 about 10 feet away from the candy hand-off spot, set the widest angle focal length and focused manually. The power saving function was turned off and the display was turned off. The camera was in Av mode at f5.6, ISO 800 and shooting RAW + JPEG. These settings were saved as custom mode C1.

The shot above is seriously cropped (using about 1/4 the full size) from the RAW image and then downrezzed to 800x600.  It was taken at ISO 800, f5.6 and 1 second exposure.  Noise reduction was applied in Adobe Camera Raw (ACR).

Actually, I messed up – or, better said – can make improvements next time with the experience gained. For starters, I should have used Auto ISO and set the maximum ISO at 3200. Sure, the images might be noisy but so what? By using f5.6, the depth of field is from 2.5 feet to infinity when the focus is set for 10 feet. But even at f2.8 the depth of field is from 4.1 feet to infinity! I should have set f2.8 for the low light and set focus at the hyperfocal distance of 7 feet to achieve focus from 3.5 feet to infinity.

Finally, I forgot that the slowest shutter speed for the G series in Av mode is 1 second. This has been a frequent complaint about G series cameras. Of course, no little goblin is going to remain in one place for more than a second anyway so the 1 second limit did not really cost me any pictures.


The G12 was triggered by the Yongnuo RF-602 wireless trigger. Normally used with flash, the RF-602 can also trigger the G12. When fitted to the G12 with the Yongnuo shutter connecting cord LS-02/C1, the RF-602 acts much the same as the Canon wired remote RS60-E3. In addition to its hotshoe connections, the RF-602 transmitter has a button that can be pressed to activate the receiver. It even has the “half pressed” shutter button function!

The G12 battery, an NB-7L clone, easily lasted the setup time plus roughly 75 minutes of being ON without the G12 power saving feature. Of course, the display was OFF. In fact, I’d used the G12 earlier that day for about 15 minutes and then viewed the results of the Halloween shoot for another 15 minutes later that night. I don’t remember how much battery power was left but nothing was blinking.

Too bad I didn’t get a great picture but wait ‘til next year!
.

Tuesday, October 12, 2010

G12: Flash compatibility problem

.
Just when I was beginning to really like the G12, I stumbled across a problem while quickly trying various accessories with it.

One of the most viewed posts on this blog has been the list of compatible flashes that work with the G9. Actually, almost anything seems to work with the G9 although you do have to be careful about high voltage with older flash units.

I regularly use non-Canon flashes (I have Canon flashes also) because the G9 will sync at very high shutter speeds to non-Canon flashes. I've also used the Cactus wireless trigger and, more recently, the Yongnuo wireless triggers. The operating mode for high speed sync is manual exposure and manual flash. All these non-Canon accessories work fine on the G9. Unfortunately, they do not work on the G12.

Correction: My non-Canon flashes and accessories do "work" on the G12 but the G12 display screen blanks out as soon as it acquires focus (using half pressed shutter button). The screen doesn't really go blank, it shows the exposure without the effect of flash -- typically very dark. That is, the non-Canon flashes and accessories work but the G12 does not work very well. I may have a setting wrong but, if so, can't find it.

After email and telephone correspondence with Canon tech services, it appears that I'm the only one (first one?) to complain about the screen blanking problem when using non-Canon accessories (wireless and flash). Basically, the Canon position is that they are not responsible for performance with non-Canon accessories.

Although I understand the Canon position, the G3 and G9 actually work fine with the very same accessories. From what I've read, the G10 and G11 also work fine with non-Canon flash accessories. Using G series with non-Canon flash is a popular technique for getting high speed sync. I think this is a bug in the G12 firmware and will be corrected; however, the Canon emails and representative gave no hope of a firmware update. Therefore, after waiting a few more days while hoping for an encouraging email, I'll be returning the G12.

Too bad, I was really beginning to like it.
.

Monday, July 5, 2010

Fireworks and Flash

.
It almost worked. I had imagined an outdoor self portrait with a huge burst of fireworks above my head and decided to try for it. I could do this in my back yard because several neighbors go all out with their own fireworks display every July 4th and New Year's eve. Last year, I got a nice fireworks picture by adding a little flash. This year I would use my 7D and two flashes off-camera. A 580EX II with Lumiquest Softbox III would be the main light. A Yongnuo YN460-II with Lumiquest snoot would be opposite the 580EX to provide separation from the background. The 580 EX II would be triggered by the on-camera flash of the 7D. The Yongnuo would be used in optical slave mode. Both the main and background flashes would be placed very close to me. The 7D would be triggered by a Yongnuo remote trigger, the RF-602. I'd stand over my mark and watch the sky behind me for a burst of brilliance. I'd then quickly turn around, smile and press the remote trigger. But what camera settings to use?

Checking DOFMaster, after a few trials, I decided to set the 7D for manual focus at the hyperfocal distance of the Canon 15-85mm zoom at 35mm focal length. With an aperture of f11, the hyperfocal distance at 35mm is 18.8 so everything from 9.4 feet to infinity should be in focus. I guessed that the 580EX II would have enough power at f11 even shooting through the Lumiquest softbox because it was close to me (it did). I set the flash ratio at 4:1 and let the Canon ETTL system control the flash. The Yongnuo 460-II was set at it lowest flash power setting.

The 7D would be shooting at f11 for depth of field. I choose manual exposure and dialed in a shutter speed of 1 second. The combination of flash at ~ 1/1000 second and shutter at 1 second might seem odd but the flash exposure was for me and the longer exposure was to catch the fireworks.

After setting up the equipment, to my aggravation, the 7D did not trigger the 580EX II. Finally I realized that with the 7D in portrait position the on-camera flash was on the left hand side and the zoom lens was blocking the triggering flash from the view of the 580EX II which was on the right hand side. I then moved the 580EX II from the camera right hand side of the scene to the left hand side and also moved the background/hair light from the left to the right. Suddenly everything worked as planned.

Unfortunately I missed most of the fireworks activity because of having to set up the gear twice. The introductory picture was the only one captured with any significant amount of fireworks in the sky. Wait 'til next year!
.

Sunday, May 9, 2010

Shoot through umbrella or bounce?

.
I have a Wescott 43” white satin umbrella with removable black cover and have always used it in the “shoot through” style. Although “always” is the correct word, actually I've not used it that often. At the wedding of my niece, I noticed that the photographer was using two large umbrellas but in the “bounce” style. I began to wonder how my own little umbrella would do if used as a bounce surface.


Once again I called on Hannah for modeling duty -- she's so patient. Leaving the black cover on the umbrella, I set it up to bounce the light from a single SB-24 flash. The flash was about 8 feet from Hannah so the umbrella was roughly ten feet away from Hannah. The SB-24 was triggered by the RF-602 wireless trigger. After a few trial pops, I set my Canon 7D for ISO 400, manual exposure of 1/125 and f5.6. With this setup, the SB-24 could be set for ½ power and therefore recycle faster than if at full power.

Somewhere I'd read that a single RF-602 receiver could trigger two flashes: one from the hot shoe and another using a PC connecting cable. This turns out to be correct – just hook 'em up and it works! I added another SB-24 to the same RF-602 receiver, set both to ¼ power, and took another shot. As expected, the shot with two flashes at ¼ power looks about the same as the shot with one flash at ½ power. The difference is that the flashes recycle faster.

Next, the black cover was removed and the flash stand rotated 180 degrees so that the two SB-24s were shooting through the umbrella. Of course, the umbrella had to be tilted downward. The flashes were the same distance from Hannah as for the bounced shots but the umbrella was closer. Leaving the SB-24s set for ¼ power, I took another shot. To my surprise, the result was a slight overexposure, perhaps a half stop; somehow, I'd expected an underexposure. At that point, I noticed that the SB-24s were set to match a 35mm focal length; that is, slightly zoomed in. I zoomed out to the maximum of 24mm and took another shot. This last shot was not quite so overexposed.

Later, using Photoshop to process the RAW files, I estimated that, for the way I did it, the shoot through method gained about a quarter of a stop of flash power. Had I first shot using the shoot through umbrella, I know I'd have adjusted the exposure downward by about a half stop based on chimping the 7D LCD. As it turns out, the resulting exposure would have been a little underexposed.

Aside from exposure, what were the differences between shoot through and bounce? Well, just look at the two shots of Hannah. Oh, the one on the left was taken using bounce and the shot on the right was taken using shoot through. Both were processed from RAW using identical ACR settings except for exposure. There is a slight difference in color although the white balance was identical in ACR. It seems to me that the picture using shoot through is slightly more softly lit. I think I'll be staying with the shoot through style.
.

Saturday, March 20, 2010

RF-602 Wireless Flash Trigger

.

Although I learned wireless “Strobist”flash techniques using the Cactus PT-04, I recently switched to the Yongnuo RF-602. In addition to being more reliable, the RF-602 can be used as a wireless shutter release for my Canon 7D. When I twisted off yet another PC connector from a Cactus PT-04 receiver, I gave up and ordered the RF-602. Perhaps I was just looking for an excuse but, whatever the reason, I now use the RF-602 for wireless flash triggering.


Like the Cactus units, the RF-602 is a simple trigger; that is, the flash is told “Fire” but flash intensity must be set in advance by the photographer. The transmitter, shown above, mounts on the camera and sends the signal to the receiver. The transmitter does not have an On/Off switch but does have a large button that can be used to trigger the flash or camera by hand. The transmitter uses one 3V CR2 lithium battery. The battery was included in the kit. The RF-602 system uses 16 channels but out-of-the-box is set to “ALL” so the first thing I did was to set a channel. The little switches are covered by a piece of tape. I left the tape on the switches and used a pencil point to change them.


The RF-602 receiver, shown above, uses two AAA alkaline batteries that were included in the kit. The battery door is a bit difficult to open – probably a good thing. The little switch on the receiver must be set to match the switch on the transmitter. The receiver does have an On/Off switch. The receiver has a flash shoe on top and a screw mount on bottom.

The RF-602 kit included a shutter connecting cord for my Canon 7D and a flash connecting cord. The flash connecting cord has a 3.5mm plug and a 6.35mm adapter plug. The basic kit does not include a PC cord so I've ordered one. Normally, I'll be using the hot shoe connection.


So far, the RF-602 system has handled everything I've thrown at it: Nikon SB24 and SB28 flashes, Vivitar 285HV, Canon 380EX, 420EX, 580EX, Yongnuo 460-II. The system works from my Canon G3, G9 and 7D. It triggers my Canon 7D. It appears to be more robust than the Cactus PT-04 system.
.

.
.