.
Last fall, I really thought that a “G11” would be launched about now. I’d already made my predictions (not too bad either!) about the G10 but just had a feeling about the G11 coming more quickly than would be expected based on the normal product cycle.
To my way of thinking, the G11 would be a CMOS evolution of the G9/10 with, perhaps, a slightly larger, less dense, sensor. Instead, Canon choose to make the SX1 IS their first CMOS Powershot camera. Unfortunately – actually, to my surprise – the SX1 IS has received a very lukewarm review from DPreview. I can only assume that there are more problems in manufacturing a high quality small CMOS sensor that I (and perhaps Canon as well) anticipated.
But today, April Fool’s Day, is a good day for “reporting” that the G11 has been launched. I bit on the first report (won’t tell you where) and then swore off the rumor and blog sites for a while.
Meanwhile, the (real) “G” camera getting all the publicity is the Panasonic GH1. No doubt the reception to the GH1 will be a contributing factor in the continued evolution of the Canon G series but it looks like we’ll have to wait a while longer for that "G11" -- or whatever it will be called.
.
Wednesday, April 1, 2009
Sunday, March 29, 2009
Blurring the Background using Photoshop
. .jpg)
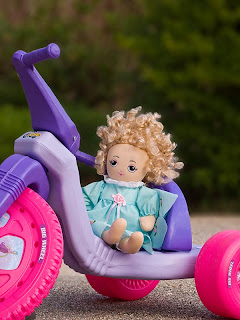
As noted in previous postings, the G9 and similar digicams tend to produce photographs with deep depth of field whereas sometimes a blurry background helps to emphasize the subject. If the background is not sufficiently blurred in-camera then Photoshop or similar programs can be used to increase the blur.
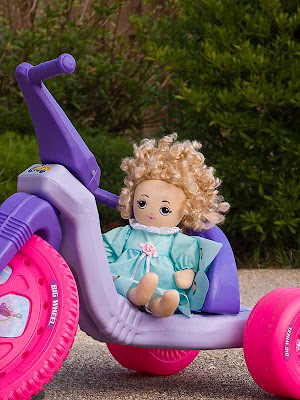
This is the same photo of Hannah as previous shown except that Photoshop was used to increase the background blur. In the past, I’ve blurred the background in Photoshop by simply making a duplicate layer, blurring that entire layer and then creating a mask to hide or show the appropriate sections. More recently, I’m learning to use the Lens Blur Filter in Photoshop CS4 (Filter, Blur, Lens Blur in the menu). For this photo, I used an Alpha Channel to make a depth map and – tediously, I might add – attempted to paint a mask of varying distances. For web viewing, the result is OK but certainly not great.
.jpg) An editing problem is differentiating the background from fine details such as Hannah’s hair. Differentiating fine details from the background is tedious and requires much patience. I tried several variations of selecting and masking. This cropped section illustrates the differences between rough (OK, impatient) masking and somewhat more careful masking.
An editing problem is differentiating the background from fine details such as Hannah’s hair. Differentiating fine details from the background is tedious and requires much patience. I tried several variations of selecting and masking. This cropped section illustrates the differences between rough (OK, impatient) masking and somewhat more careful masking.
I won’t even try to describe how to make the depth map but here are some links to instructions from others
http://www.computer-darkroom.com/tutorials/tutorial_9_1.htm
http://www.outbackphoto.com/workflow/wf_51/essay.html
http://photography-on-the.net/forum/showthread.php?t=102294
After using Photoshop to blur the background in pictures taken with my G9, I’ve resolved to use a different camera whenever the subject and scene call for a blurry background!
.
.jpg)
As noted in previous postings, the G9 and similar digicams tend to produce photographs with deep depth of field whereas sometimes a blurry background helps to emphasize the subject. If the background is not sufficiently blurred in-camera then Photoshop or similar programs can be used to increase the blur.
This is the same photo of Hannah as previous shown except that Photoshop was used to increase the background blur. In the past, I’ve blurred the background in Photoshop by simply making a duplicate layer, blurring that entire layer and then creating a mask to hide or show the appropriate sections. More recently, I’m learning to use the Lens Blur Filter in Photoshop CS4 (Filter, Blur, Lens Blur in the menu). For this photo, I used an Alpha Channel to make a depth map and – tediously, I might add – attempted to paint a mask of varying distances. For web viewing, the result is OK but certainly not great.
.jpg) An editing problem is differentiating the background from fine details such as Hannah’s hair. Differentiating fine details from the background is tedious and requires much patience. I tried several variations of selecting and masking. This cropped section illustrates the differences between rough (OK, impatient) masking and somewhat more careful masking.
An editing problem is differentiating the background from fine details such as Hannah’s hair. Differentiating fine details from the background is tedious and requires much patience. I tried several variations of selecting and masking. This cropped section illustrates the differences between rough (OK, impatient) masking and somewhat more careful masking.I won’t even try to describe how to make the depth map but here are some links to instructions from others
http://www.computer-darkroom.com/tutorials/tutorial_9_1.htm
http://www.outbackphoto.com/workflow/wf_51/essay.html
http://photography-on-the.net/forum/showthread.php?t=102294
After using Photoshop to blur the background in pictures taken with my G9, I’ve resolved to use a different camera whenever the subject and scene call for a blurry background!
.
Wednesday, March 11, 2009
My Story


.jpg)
.
After some years of researching Buck family history, my dad, Gordon Sandlin Buck Sr., wrote his own memoirs, which he called "My Story". I promised to get his memoirs published and have (finally) done so. "My Story" is available at the Blurb website for print-on-demand self publishing.
My dad's memoirs begin with his early and fond memories of his grandfather, Matthew Masterson, in Decatur, Alabama. He wrote about growing up in Decatur and then being drafted into the army. In the army, he learned electronics and especially the details of radar. During World War II, my dad was installing and maintaining radar stations in and around Central America, especially the Panama Canal. After WWII, my dad eventually returned to radar as a civilian instructor for the Air Force in Biloxi, Mississippi.
The book is really a family book but I'm making it available on the Blurb website just in case someone else is interested. The first ten pages of the book can be previewed.
This was a good project and I hope seeing this book and realizing how it was done will encourage others to do so as well.
.
Wednesday, February 4, 2009
Comparison of all Powershot G Cameras
.
In this very interesting article, the author conducted tests of every Powershot G camera: G1, G2, G3, G5, G6, G7, G9, G10. Cropped versions of both uprezzed and downrezzed images are shown for all ISO sensitivities. Prints were made and three people evaluated and ranked those prints. Very interesting!
.
Monday, February 2, 2009
G9: Blurring the background
. .jpg)
A blurred background is useful for isolating and emphasizing the main subject. Extremely blurred backgrounds add a particularly nice effect to portraits. Unfortunately, extreme background blur is not easily obtained using short focal length lenses such as are used with the Canon G series and most other small sensor digital cameras.
The concept for producing a blurred background is simple: use a combination of focal length, aperture and distance such that the background is outside the depth of field. In practice, this means selecting a telephoto lens with a large aperture, placing the camera near the subject and placing the subject away from the background. With the G9, this means zooming the lens to near maximum, forcing the largest possible aperture and placing the subject far from the background.
A previous posting showed how the depth of field varied with the focal length of the G9 at “portrait” distances. Another post showed the maximum aperture for those focal lengths. These two posts illustrate the relationships between zoom (focal length), shooting distance and aperture for the G9.
For this picture of Hannah, I used the G9 at maximum zoom, f4.8 and was about 12 feet from her. The shrubbery was another 12 feet away; the fence (barely discernable) was about 30 feet behind Hannah. These are fairly generous distances; in fact, more separation than is often available. Even so, the background behind Hannah is not particularly blurred (click for a larger image).
Depth-of-field calculations are based on small but noticeable blurs at certain enlargements and viewing distances. For more information, visit and study at DOFMaster. In contrast, the background blur that many photographers want for portraiture is extreme. My own personal favorite is of Wallace; however, it was not made with the G9.
Small sensor cameras like the G9 are great when the goal is to have nearly everything in focus but such cameras are just not the right tool for producing extreme background blur for ‘portrait’ photography.
.
.jpg)
A blurred background is useful for isolating and emphasizing the main subject. Extremely blurred backgrounds add a particularly nice effect to portraits. Unfortunately, extreme background blur is not easily obtained using short focal length lenses such as are used with the Canon G series and most other small sensor digital cameras.
The concept for producing a blurred background is simple: use a combination of focal length, aperture and distance such that the background is outside the depth of field. In practice, this means selecting a telephoto lens with a large aperture, placing the camera near the subject and placing the subject away from the background. With the G9, this means zooming the lens to near maximum, forcing the largest possible aperture and placing the subject far from the background.
A previous posting showed how the depth of field varied with the focal length of the G9 at “portrait” distances. Another post showed the maximum aperture for those focal lengths. These two posts illustrate the relationships between zoom (focal length), shooting distance and aperture for the G9.
For this picture of Hannah, I used the G9 at maximum zoom, f4.8 and was about 12 feet from her. The shrubbery was another 12 feet away; the fence (barely discernable) was about 30 feet behind Hannah. These are fairly generous distances; in fact, more separation than is often available. Even so, the background behind Hannah is not particularly blurred (click for a larger image).
Depth-of-field calculations are based on small but noticeable blurs at certain enlargements and viewing distances. For more information, visit and study at DOFMaster. In contrast, the background blur that many photographers want for portraiture is extreme. My own personal favorite is of Wallace; however, it was not made with the G9.
Small sensor cameras like the G9 are great when the goal is to have nearly everything in focus but such cameras are just not the right tool for producing extreme background blur for ‘portrait’ photography.
.
Thursday, January 22, 2009
G9: Portrait Distance
..jpg)
It seems to me that actual height for a tightly composed head shot is about two feet. How far away from the subject should the camera be to capture this two foot high subject? I suppose the distance can be calculated but frankly it is just easier to tape a yardstick to the wall and take a few shots.
For my G9, these are the camera-to-subject distances for various focal lengths.

The focal lengths in the chart are the same as the focal lengths from the previous posting which gave the maximum aperture for various focal lengths.
The depth of field can be calculated from distance, focal length and aperture. Taking some liberties in rounding off, depth of field for a portrait setting with the G9 is about one foot – give or take a few inches.
This little experiment would seem to indicate that a blurred background would be easily obtained with the Canon G9; however, the opposite is true. In fact, blurred backgrounds are difficult to obtain and extreme blur for portraits and larger scenes is nearly impossible to achieve with the G9. The apparent discrepancy is because the depth of field calculation is intended to predict the onset of blur and not the extreme.
Next: an example of typical G9 background blur for portrait setting
.
.jpg)
It seems to me that actual height for a tightly composed head shot is about two feet. How far away from the subject should the camera be to capture this two foot high subject? I suppose the distance can be calculated but frankly it is just easier to tape a yardstick to the wall and take a few shots.
For my G9, these are the camera-to-subject distances for various focal lengths.
The focal lengths in the chart are the same as the focal lengths from the previous posting which gave the maximum aperture for various focal lengths.
The depth of field can be calculated from distance, focal length and aperture. Taking some liberties in rounding off, depth of field for a portrait setting with the G9 is about one foot – give or take a few inches.
This little experiment would seem to indicate that a blurred background would be easily obtained with the Canon G9; however, the opposite is true. In fact, blurred backgrounds are difficult to obtain and extreme blur for portraits and larger scenes is nearly impossible to achieve with the G9. The apparent discrepancy is because the depth of field calculation is intended to predict the onset of blur and not the extreme.
Next: an example of typical G9 background blur for portrait setting
.
Monday, January 5, 2009
G9: Focus Vertically or Horizontally?
.
Although I’ve made several postings about focusing the G9 (sort of cross referenced here), a few days ago I began to think that my G9 was focusing much better when held horizontally (landscape) than when held vertically (portrait). In fact, sometimes it would not focus when turned vertically. Was my G9 broken?
On further review, I’ve come to realize that the small Flexizone frame works best on vertical lines when held horizontally and on horizontal lines when held vertically. Said another way, when shooting in landscape orientation (the “normal” shot), look for a vertical line on which to focus. When shooting a portrait, look for a horizontal line and focus on it.
My problem – when I feared my G9 was broken – was that I was shooting in portrait orientation and the subject lines were vertical. The G9 just would not focus on those vertical lines with the small Flexizone frame. But turning the camera to landscape orientation, it focused immediately.
In much the same way, when using the small Flexizone frame, the G9 struggles to focus on simple horizontal lines when the camera is in landscape orientation. Turned vertically, focusing is routine on those same horizontal lines.
The AiAF matrix of focus points does not have this problem – probably because one of the focus points usually finds an appropriate contrast pattern.
I still prefer the small Flexizone frame but now have a better understanding of those missed focuses. Strange, but true.
.
Subscribe to:
Posts (Atom)