.
The image produced by the G9 is 4000 pixels x 3000 pixels for a total of 12 million pixels. We say that the G9 is a 12 megapixel camera; I usually write this as 12 MP. So a G9 image file would be 12 megabytes (MB), right? Well, not necessarily and probably never exactly.
The in-camera JPEG file produced by the G9 is roughly 5 MB in size for the “Large, Superfine” description. Page 261 of the G9 manual gives estimated file sizes for the various JPEG and RAW settings but these are only estimates. The file sizes are smaller than might be expected because, as noted previously, JPEG files are not only compressed but also are lossy; that is, some data is discarded during the compression process. The results of the mathematical algorithm for lossy compression vary with the content of the image file. In other words, file size varies with the picture so you never know the file size until after the picture has been taken.
To see for myself how the file size varies, I put my G9 on a tripod and photographed a mundane scene of my messy bookcase – which you will not get to see. I set the G9 on Large, Superfine JPEG, wide angle, manual exposure at 1/10 second, f2.8, auto white balance and took 22 pictures. Why 22 pictures? Well, I varied the contrast, sharpening and saturation for every picture. File sizes ranged from 4561 KB to 5741 KB. Remember: the scene and lighting was identical for each picture.
Using My Colors, I varied the Custom Color setting for contrast, sharpening and saturation. For those settings, considering the mid-point (“Normal”) as being zero (0), I took pictures at the low extreme, the Normal and the high extreme; I think of these settings as being -2, 0, +2. Here are some examples of files size:
Cont Sharp Sat Size, KB
0 0 0 5142
-2 -2 -2 4596
-2 -2 0 4561
-2 0 0 5070
0 +2 0 5532
0 0 +2 5265
+2 +2 +2 5565
-2 +2 +2 5741
In comparison, a RAW file was 13,600 KB and the accompanying JPEG at Large+Fine (not Superfine) was 3089 KB when the settings were 0, 0, 0.
A quick linear regression analysis shows that the amount of sharpening has the most significant effect on file size, followed by saturation. Contrast has the least effect on file size. (Note: The linear regression does not provide an exact match. It predicts the smallest file size at -2, -2, -2 and the largest at +2, +2, +2; however, the correlation is pretty good.)
My explanation? Sharpening tends to increase apparent detail and those details – whether real or not – are not as compressible. I was a little surprised by the effect of saturation and contrast. I actually thought that reduced saturation and contrast might increase the file size but this was not the case. Finally, there is a cross correlation between these three variables but it is not very significant with regard to file size.
My conclusion? I still shoot mostly in RAW mode. When I do shoot in JPEG, I usually leave the contrast, sharpening and saturation at “Normal” but this is more of a convenience than a strong preference.
.
Showing posts with label my colors. Show all posts
Showing posts with label my colors. Show all posts
Saturday, September 13, 2008
Friday, February 1, 2008
G9 and the In-Camera JPEG
.
The G9 can create its own JPEG; I’ve taken to calling this the in-camera JPEG.
The G9 in-camera JPEG can make quite a nice picture and is very convenient. It can even be customized and fine tuned through the G9 options. I sometimes think of the in-camera JPEG as being analogous to a slide made with transparency film. A particular type of film would be purchased to match the conditions and purpose of the photo shoot; for example, a high speed, outdoor (sunlight) film having saturated colors and high contrast. When shooting in-camera JPEGs, you can, in fact should, make such adjustments. To many photographers, this is only natural. Alternatively, the G9 can and will do this for you.
When the G9 is set on full (green) Auto mode, all adjustments are made for you. In fact, you can’t change the settings for color saturation, contrast, etc. In order to fine tune the G9 JPEG to suit your own tastes, you’ll have to shoot in either P, Tv, Av or M mode – the “creative” modes.
When fine tuning or customizing the G9 image settings, the first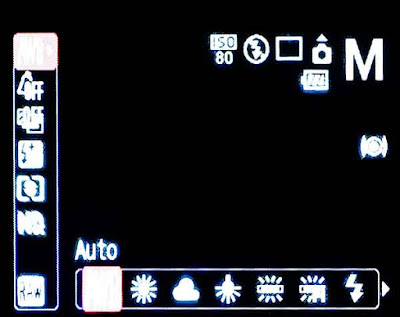 decision to be made is about the lighting – or rather the light source. With the G9 in either P, Tv, Av or M mode, press the Func button to get to the various options. The very first option, top left on the LCD, probably shows “AWB” for Automatic White balance unless you’ve already changed it. Across the bottom of the LCD screen, is a picture of the sun, a cloud, etc. Scroll through these and pick the one that seems to match your setting and light source.
The options just below the white balance (light source) setting are labeled “My Colors”. These are very popular adjustments. The default setting is “Off” (as shown in the first image) but along the bottom of the LCD screen you’ll see options for increasing saturation (“Vivid”), decreasing saturation (“Neutral”), and many more. The very last option, “Custom Color” offers the most flexibility. By selecting “Custom Color” and then pressing the Display button, you’ll have access to fine tuning the contrast, sharpness, saturation, red, blue, green, and skin tone. It may take some tinkering to find the settings that you like. In all honesty, I’ve never used these features.
Even though a JPEG image has been sort of con densed from the full data set collected by the sensor, JPEGs can be edited. Many photographers who routinely edit their JPEGs seem to set their cameras for slightly less contrast, less sharpness, and less saturation. If necessary, these parameters can be fine tuned later during the editing process.
In a future post, I'll show some comparisons of in-camera JPEGs using the default and adjusted settings.
.
The G9 can create its own JPEG; I’ve taken to calling this the in-camera JPEG.
The G9 in-camera JPEG can make quite a nice picture and is very convenient. It can even be customized and fine tuned through the G9 options. I sometimes think of the in-camera JPEG as being analogous to a slide made with transparency film. A particular type of film would be purchased to match the conditions and purpose of the photo shoot; for example, a high speed, outdoor (sunlight) film having saturated colors and high contrast. When shooting in-camera JPEGs, you can, in fact should, make such adjustments. To many photographers, this is only natural. Alternatively, the G9 can and will do this for you.
When the G9 is set on full (green) Auto mode, all adjustments are made for you. In fact, you can’t change the settings for color saturation, contrast, etc. In order to fine tune the G9 JPEG to suit your own tastes, you’ll have to shoot in either P, Tv, Av or M mode – the “creative” modes.
When fine tuning or customizing the G9 image settings, the first
 decision to be made is about the lighting – or rather the light source. With the G9 in either P, Tv, Av or M mode, press the Func button to get to the various options. The very first option, top left on the LCD, probably shows “AWB” for Automatic White balance unless you’ve already changed it. Across the bottom of the LCD screen, is a picture of the sun, a cloud, etc. Scroll through these and pick the one that seems to match your setting and light source.
The options just below the white balance (light source) setting are labeled “My Colors”. These are very popular adjustments. The
 default setting is “Off” (as shown in the first image) but along the bottom of the LCD screen you’ll see options for increasing saturation (“Vivid”), decreasing saturation (“Neutral”), and many more. The very last option, “Custom Color” offers the most flexibility. By selecting “Custom Color” and then pressing the Display button, you’ll have access to fine tuning the contrast, sharpness, saturation, red, blue, green, and skin tone. It may take some tinkering to find the settings that you like. In all honesty, I’ve never used these features.
Even though a JPEG image has been sort of con
 densed from the full data set collected by the sensor, JPEGs can be edited. Many photographers who routinely edit their JPEGs seem to set their cameras for slightly less contrast, less sharpness, and less saturation. If necessary, these parameters can be fine tuned later during the editing process.
In a future post, I'll show some comparisons of in-camera JPEGs using the default and adjusted settings.
.
Subscribe to:
Posts (Atom)