.
Photography is so useful, so interesting and the new digital cameras so powerful and intriguing that photography forums on the Internet are constantly being visited by newcomers. Naturally, many of these new or upgraded photographers ask the same questions. One such question – especially for those who wish to become a bit more serious about photography – is “Should I shot in JPEG or Raw?” However innocently the question is asked (and it is not always innocently asked), the asking is like poking a stick into a hornet’s nest. Raw vs JPEG is an ongoing debate that is apparently irresolvable to many but obvious to some.
The JPEG delivered by our cameras is post processed from the raw data in-camera. Some of the in-camera post processing parameters can be tweaked a bit to suit personal tastes. Certainly the in-camera JPEG can be a fine picture and it is used by many (most? almost all?) photographers. Just as certainly -- in fact, absolutely -- the JPEG contains less information than the original raw image file because the JPEG is post processed and lossy compressed to an 8 bit basis from that 12 bit (Powershot G series) raw "negative".
Whether an individual can make a "better" picture from raw than the Canon software engineers (as directed by Canon marketing) do from the in-camera JPEG is a function of their own skills and available time. If someone tells me that they can make a better picture from raw than is delivered by the in-camera JPEG then I believe them. But when someone tells me that they cannot improve on the in-camera JPEG then I believe them as well. I even believe those who say that their post processed picture from the in-camera JPEG is better than their post processed picture from raw!
There is a place for both the in-camera JPEG and post processed raw images. Think about how you intend to use the camera and your pictures. For snapshot sized prints, computer monitor sized images and even HD-TV sized images, it probably does not matter a lot whether you use the in-camera JPEG or post process your own from the raw file -- especially if you select the correct white balance, get the exposure right and have tweaked the in-camera adjustments ("My Colors") for the JPEG to your own tastes. On the other hand, if your goal is a large print (say, 12x18 inches), if you've been forced to use a high ISO or if you choose to crop significantly then you should consider shooting in raw. Also, raw image files are somewhat more forgiving because exposure and white balance can be adjusted during conversion of the raw file (I know, I know … get it right the first time, etc., etc.)
I almost always get a raw image file from my G9. Sometimes I shoot in raw only and sometimes using raw+JPEG. I rarely shoot JPEG only. I'm not a pro; there are pros shooting raw and pros shooting JPEG. I'm glad that we have a choice.
.
Showing posts with label in-camera jpg. Show all posts
Showing posts with label in-camera jpg. Show all posts
Monday, April 13, 2009

Saturday, September 13, 2008
G9 File Size
.
The image produced by the G9 is 4000 pixels x 3000 pixels for a total of 12 million pixels. We say that the G9 is a 12 megapixel camera; I usually write this as 12 MP. So a G9 image file would be 12 megabytes (MB), right? Well, not necessarily and probably never exactly.
The in-camera JPEG file produced by the G9 is roughly 5 MB in size for the “Large, Superfine” description. Page 261 of the G9 manual gives estimated file sizes for the various JPEG and RAW settings but these are only estimates. The file sizes are smaller than might be expected because, as noted previously, JPEG files are not only compressed but also are lossy; that is, some data is discarded during the compression process. The results of the mathematical algorithm for lossy compression vary with the content of the image file. In other words, file size varies with the picture so you never know the file size until after the picture has been taken.
To see for myself how the file size varies, I put my G9 on a tripod and photographed a mundane scene of my messy bookcase – which you will not get to see. I set the G9 on Large, Superfine JPEG, wide angle, manual exposure at 1/10 second, f2.8, auto white balance and took 22 pictures. Why 22 pictures? Well, I varied the contrast, sharpening and saturation for every picture. File sizes ranged from 4561 KB to 5741 KB. Remember: the scene and lighting was identical for each picture.
Using My Colors, I varied the Custom Color setting for contrast, sharpening and saturation. For those settings, considering the mid-point (“Normal”) as being zero (0), I took pictures at the low extreme, the Normal and the high extreme; I think of these settings as being -2, 0, +2. Here are some examples of files size:
Cont Sharp Sat Size, KB
0 0 0 5142
-2 -2 -2 4596
-2 -2 0 4561
-2 0 0 5070
0 +2 0 5532
0 0 +2 5265
+2 +2 +2 5565
-2 +2 +2 5741
In comparison, a RAW file was 13,600 KB and the accompanying JPEG at Large+Fine (not Superfine) was 3089 KB when the settings were 0, 0, 0.
A quick linear regression analysis shows that the amount of sharpening has the most significant effect on file size, followed by saturation. Contrast has the least effect on file size. (Note: The linear regression does not provide an exact match. It predicts the smallest file size at -2, -2, -2 and the largest at +2, +2, +2; however, the correlation is pretty good.)
My explanation? Sharpening tends to increase apparent detail and those details – whether real or not – are not as compressible. I was a little surprised by the effect of saturation and contrast. I actually thought that reduced saturation and contrast might increase the file size but this was not the case. Finally, there is a cross correlation between these three variables but it is not very significant with regard to file size.
My conclusion? I still shoot mostly in RAW mode. When I do shoot in JPEG, I usually leave the contrast, sharpening and saturation at “Normal” but this is more of a convenience than a strong preference.
.
The image produced by the G9 is 4000 pixels x 3000 pixels for a total of 12 million pixels. We say that the G9 is a 12 megapixel camera; I usually write this as 12 MP. So a G9 image file would be 12 megabytes (MB), right? Well, not necessarily and probably never exactly.
The in-camera JPEG file produced by the G9 is roughly 5 MB in size for the “Large, Superfine” description. Page 261 of the G9 manual gives estimated file sizes for the various JPEG and RAW settings but these are only estimates. The file sizes are smaller than might be expected because, as noted previously, JPEG files are not only compressed but also are lossy; that is, some data is discarded during the compression process. The results of the mathematical algorithm for lossy compression vary with the content of the image file. In other words, file size varies with the picture so you never know the file size until after the picture has been taken.
To see for myself how the file size varies, I put my G9 on a tripod and photographed a mundane scene of my messy bookcase – which you will not get to see. I set the G9 on Large, Superfine JPEG, wide angle, manual exposure at 1/10 second, f2.8, auto white balance and took 22 pictures. Why 22 pictures? Well, I varied the contrast, sharpening and saturation for every picture. File sizes ranged from 4561 KB to 5741 KB. Remember: the scene and lighting was identical for each picture.
Using My Colors, I varied the Custom Color setting for contrast, sharpening and saturation. For those settings, considering the mid-point (“Normal”) as being zero (0), I took pictures at the low extreme, the Normal and the high extreme; I think of these settings as being -2, 0, +2. Here are some examples of files size:
Cont Sharp Sat Size, KB
0 0 0 5142
-2 -2 -2 4596
-2 -2 0 4561
-2 0 0 5070
0 +2 0 5532
0 0 +2 5265
+2 +2 +2 5565
-2 +2 +2 5741
In comparison, a RAW file was 13,600 KB and the accompanying JPEG at Large+Fine (not Superfine) was 3089 KB when the settings were 0, 0, 0.
A quick linear regression analysis shows that the amount of sharpening has the most significant effect on file size, followed by saturation. Contrast has the least effect on file size. (Note: The linear regression does not provide an exact match. It predicts the smallest file size at -2, -2, -2 and the largest at +2, +2, +2; however, the correlation is pretty good.)
My explanation? Sharpening tends to increase apparent detail and those details – whether real or not – are not as compressible. I was a little surprised by the effect of saturation and contrast. I actually thought that reduced saturation and contrast might increase the file size but this was not the case. Finally, there is a cross correlation between these three variables but it is not very significant with regard to file size.
My conclusion? I still shoot mostly in RAW mode. When I do shoot in JPEG, I usually leave the contrast, sharpening and saturation at “Normal” but this is more of a convenience than a strong preference.
.
Wednesday, April 2, 2008
Sky Too Bright?
.

In Photo #4, the 50/50 split, graduated neutral density filter (Tiffen ND 0.6) performed as expected but the upper clouds were darkened excessively. At 1/250 sec, it is slightly underexposed – perhaps 1/3 stop. Photo #5 shows the effects of a polarizing filter (Tiffen Circular). The filter was rotated for maximum sky detail. Unlike my G3, the effects of rotating the polarizing filter could be seen in the G9 LCD display. At 1/160 sec, the polarized exposure is just about right according to the histogram.
Nest is a comparison of raw and jpg; shooting in raw + jpg mode allowed a direct comparison. The third set of photos (below) compares Photo 3 (the in-camera jpg from the first and second sets) to the processed raw version, Photo 6. Similarly, Photo 7 is the raw version of Photo 5.

Both raw files (6 and 7) were processed in Adobe Camera Raw using the same settings. Surprisingly, no exposure adjustment was needed -- even though I’d previously noted that Photo 3 was slightly overexposed. The “Recovery” adjustment compensated for this highlight recovery. The ACR settings for Photo 6 and 7 were:
WB: Daylight
Exposure adjustment: 0
Recovery: 15
Fill: 10
Black: 8
Brightness: 40
Contrast: 0
Clarity: 40
Vibrance: 8
Saturation: 3
A “Medium Contrast Curve”
Sharpening: 80
Radius: 0.8
Detail: 30
Masking: 0
Luminance Noise Reduction: 0
Color Noise Reduction: 25
All other ACR settings were at zero. After opening in ACR, “Smart Sharpening” at 100 was applied in Photoshop CS3. No other post processing was applied.
In retrospect, I should have applied a bit more saturation to Photos 6 and 7 just for purposes of comparison to Photo 3 because Canon’s in-camera jpgs are a bit saturated (some say over-saturated).
Lessons learned? Well, I’ll continue to shoot in raw and will be using my polarizing filter more often.
Bright sky and dark foreground are not a happy combination for photographers unless both can be captured. This difficulty is not unique to digital photography. Although sometimes the available dynamic range of the digital camera (or film) is inadequate, often the light meter is simply fooled. The three photos above illustrate this problem. All photos were taken within a short time (but the clouds were moving quickly) with my G9 mounted on a tripod, evaluative metering, Av mode at f5.6, ISO 80 and shooting raw + jpg. The photos above were downsized from the in-camera jpg and sharpened for web viewing (PK Sharpener ) but are otherwise unprocessed.
For the bright sky problem, the hoped-for-solution is the “correct” exposure. Think about a bright sky scene from the point of view of the exposure meter. If there is only a little sky, then the exposure is based on the ground – 1/160 sec in Photo #1 above. If the composition is mostly sky, the exposure meter thinks there is a lot of available light – 1/640 sec in Photo #2. As the camera operator, uh, photographer, you might manually set an in-between exposure value. Some metering systems attempt to do this automatically; Photo #3 was taken at 1/320 sec as determined automatically by the G9. So Photo #1 has good ground but no sky detail; Photo #2 has a beautiful sky but dark ground; Photo #3 is sort of a blah in-between.
While taking photos 1, 2 and 3 above, the live histogram of the G9 indicated that Photo 1 was overexposed –a little more than a full f-stop. Photo 2 was slightly underexposed – about a half stop. Photo 3 is slightly overexposed – perhaps a half stop. So the “best” exposure would have been about f5.6 and 1/400 sec manual exposure (not very far off Sunny 16 for the G9) or by dialing in a -2/3 exposure compensation for Av mode. I didn’t get a shot at f5.6 and 1/400; however, I was shooting with +/- 1 auto exposure bracketing so I’m pretty sure of those relative effects.
I was interested in comparing the in-camera jpgs for normal, graduated neutral density filter and a polarizing filter; these photos are shown below (Photo 3 is repeated). Again, all photos were taken in Av mode using evaluative metering without exposure compensation.
For the bright sky problem, the hoped-for-solution is the “correct” exposure. Think about a bright sky scene from the point of view of the exposure meter. If there is only a little sky, then the exposure is based on the ground – 1/160 sec in Photo #1 above. If the composition is mostly sky, the exposure meter thinks there is a lot of available light – 1/640 sec in Photo #2. As the camera operator, uh, photographer, you might manually set an in-between exposure value. Some metering systems attempt to do this automatically; Photo #3 was taken at 1/320 sec as determined automatically by the G9. So Photo #1 has good ground but no sky detail; Photo #2 has a beautiful sky but dark ground; Photo #3 is sort of a blah in-between.
While taking photos 1, 2 and 3 above, the live histogram of the G9 indicated that Photo 1 was overexposed –a little more than a full f-stop. Photo 2 was slightly underexposed – about a half stop. Photo 3 is slightly overexposed – perhaps a half stop. So the “best” exposure would have been about f5.6 and 1/400 sec manual exposure (not very far off Sunny 16 for the G9) or by dialing in a -2/3 exposure compensation for Av mode. I didn’t get a shot at f5.6 and 1/400; however, I was shooting with +/- 1 auto exposure bracketing so I’m pretty sure of those relative effects.
I was interested in comparing the in-camera jpgs for normal, graduated neutral density filter and a polarizing filter; these photos are shown below (Photo 3 is repeated). Again, all photos were taken in Av mode using evaluative metering without exposure compensation.
In Photo #4, the 50/50 split, graduated neutral density filter (Tiffen ND 0.6) performed as expected but the upper clouds were darkened excessively. At 1/250 sec, it is slightly underexposed – perhaps 1/3 stop. Photo #5 shows the effects of a polarizing filter (Tiffen Circular). The filter was rotated for maximum sky detail. Unlike my G3, the effects of rotating the polarizing filter could be seen in the G9 LCD display. At 1/160 sec, the polarized exposure is just about right according to the histogram.
Nest is a comparison of raw and jpg; shooting in raw + jpg mode allowed a direct comparison. The third set of photos (below) compares Photo 3 (the in-camera jpg from the first and second sets) to the processed raw version, Photo 6. Similarly, Photo 7 is the raw version of Photo 5.
Both raw files (6 and 7) were processed in Adobe Camera Raw using the same settings. Surprisingly, no exposure adjustment was needed -- even though I’d previously noted that Photo 3 was slightly overexposed. The “Recovery” adjustment compensated for this highlight recovery. The ACR settings for Photo 6 and 7 were:
WB: Daylight
Exposure adjustment: 0
Recovery: 15
Fill: 10
Black: 8
Brightness: 40
Contrast: 0
Clarity: 40
Vibrance: 8
Saturation: 3
A “Medium Contrast Curve”
Sharpening: 80
Radius: 0.8
Detail: 30
Masking: 0
Luminance Noise Reduction: 0
Color Noise Reduction: 25
All other ACR settings were at zero. After opening in ACR, “Smart Sharpening” at 100 was applied in Photoshop CS3. No other post processing was applied.
In retrospect, I should have applied a bit more saturation to Photos 6 and 7 just for purposes of comparison to Photo 3 because Canon’s in-camera jpgs are a bit saturated (some say over-saturated).
Lessons learned? Well, I’ll continue to shoot in raw and will be using my polarizing filter more often.
.
Friday, March 7, 2008
G9 and In-Camera Noise Reduction
.
After writing about how to tune the in-camera jpg from the G9, I've been asked about tuning the noise reduction as well. Although some cameras have adjustable noise reduction/treatment settings, the G9 does not. Noise reduction is applied to all JPEG images as deemed necessary and appropriate by Canon. To get around the in-camera G9 noise reduction process, you’ll have to shoot in raw mode.
.
After writing about how to tune the in-camera jpg from the G9, I've been asked about tuning the noise reduction as well. Although some cameras have adjustable noise reduction/treatment settings, the G9 does not. Noise reduction is applied to all JPEG images as deemed necessary and appropriate by Canon. To get around the in-camera G9 noise reduction process, you’ll have to shoot in raw mode.
.
Friday, February 1, 2008
G9 and the In-Camera JPEG
.
The G9 can create its own JPEG; I’ve taken to calling this the in-camera JPEG.
The G9 in-camera JPEG can make quite a nice picture and is very convenient. It can even be customized and fine tuned through the G9 options. I sometimes think of the in-camera JPEG as being analogous to a slide made with transparency film. A particular type of film would be purchased to match the conditions and purpose of the photo shoot; for example, a high speed, outdoor (sunlight) film having saturated colors and high contrast. When shooting in-camera JPEGs, you can, in fact should, make such adjustments. To many photographers, this is only natural. Alternatively, the G9 can and will do this for you.
When the G9 is set on full (green) Auto mode, all adjustments are made for you. In fact, you can’t change the settings for color saturation, contrast, etc. In order to fine tune the G9 JPEG to suit your own tastes, you’ll have to shoot in either P, Tv, Av or M mode – the “creative” modes.
When fine tuning or customizing the G9 image settings, the first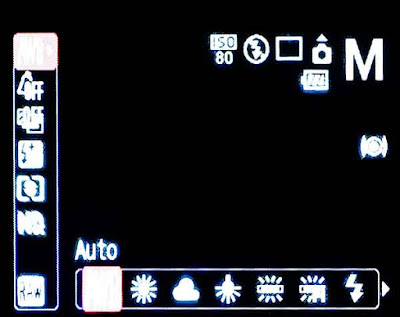 decision to be made is about the lighting – or rather the light source. With the G9 in either P, Tv, Av or M mode, press the Func button to get to the various options. The very first option, top left on the LCD, probably shows “AWB” for Automatic White balance unless you’ve already changed it. Across the bottom of the LCD screen, is a picture of the sun, a cloud, etc. Scroll through these and pick the one that seems to match your setting and light source.
The options just below the white balance (light source) setting are labeled “My Colors”. These are very popular adjustments. The default setting is “Off” (as shown in the first image) but along the bottom of the LCD screen you’ll see options for increasing saturation (“Vivid”), decreasing saturation (“Neutral”), and many more. The very last option, “Custom Color” offers the most flexibility. By selecting “Custom Color” and then pressing the Display button, you’ll have access to fine tuning the contrast, sharpness, saturation, red, blue, green, and skin tone. It may take some tinkering to find the settings that you like. In all honesty, I’ve never used these features.
Even though a JPEG image has been sort of con densed from the full data set collected by the sensor, JPEGs can be edited. Many photographers who routinely edit their JPEGs seem to set their cameras for slightly less contrast, less sharpness, and less saturation. If necessary, these parameters can be fine tuned later during the editing process.
In a future post, I'll show some comparisons of in-camera JPEGs using the default and adjusted settings.
.
The G9 can create its own JPEG; I’ve taken to calling this the in-camera JPEG.
The G9 in-camera JPEG can make quite a nice picture and is very convenient. It can even be customized and fine tuned through the G9 options. I sometimes think of the in-camera JPEG as being analogous to a slide made with transparency film. A particular type of film would be purchased to match the conditions and purpose of the photo shoot; for example, a high speed, outdoor (sunlight) film having saturated colors and high contrast. When shooting in-camera JPEGs, you can, in fact should, make such adjustments. To many photographers, this is only natural. Alternatively, the G9 can and will do this for you.
When the G9 is set on full (green) Auto mode, all adjustments are made for you. In fact, you can’t change the settings for color saturation, contrast, etc. In order to fine tune the G9 JPEG to suit your own tastes, you’ll have to shoot in either P, Tv, Av or M mode – the “creative” modes.
When fine tuning or customizing the G9 image settings, the first
 decision to be made is about the lighting – or rather the light source. With the G9 in either P, Tv, Av or M mode, press the Func button to get to the various options. The very first option, top left on the LCD, probably shows “AWB” for Automatic White balance unless you’ve already changed it. Across the bottom of the LCD screen, is a picture of the sun, a cloud, etc. Scroll through these and pick the one that seems to match your setting and light source.
The options just below the white balance (light source) setting are labeled “My Colors”. These are very popular adjustments. The
 default setting is “Off” (as shown in the first image) but along the bottom of the LCD screen you’ll see options for increasing saturation (“Vivid”), decreasing saturation (“Neutral”), and many more. The very last option, “Custom Color” offers the most flexibility. By selecting “Custom Color” and then pressing the Display button, you’ll have access to fine tuning the contrast, sharpness, saturation, red, blue, green, and skin tone. It may take some tinkering to find the settings that you like. In all honesty, I’ve never used these features.
Even though a JPEG image has been sort of con
 densed from the full data set collected by the sensor, JPEGs can be edited. Many photographers who routinely edit their JPEGs seem to set their cameras for slightly less contrast, less sharpness, and less saturation. If necessary, these parameters can be fine tuned later during the editing process.
In a future post, I'll show some comparisons of in-camera JPEGs using the default and adjusted settings.
.
Wednesday, January 23, 2008
G9: In the Raw and/or JPEG
.
Shortly after pressing that shutter button, the internal computer chip in your digital camera begins to process the data collected by the sensor and then saves that data as a “picture” in the form of a data file on the memory card. Most likely, that data file is either a JPEG or a raw file format. JPEG is an acronym for Joint Photograpic Experts Group . JPEG files have “jpg” as the filename extension; for example, myfile.jpg is the filename of a JPEG image. Whereas JPEG files follow international standards, a raw file is proprietary to the particular camera manufacturer according to their needs. Therefore, many devices have software to read and process JPEG images but few can deal with raw images because all the raw image files are different.
In the case of the Canon G9, the raw image files have the filename extension cr2; for example, myfile.cr2 is (probably) a Canon raw image file. However, just because the filename has the .cr2 extension does not necessarily mean that it came from a Canon G9 camera because all the current Canon cameras having raw capability save their raw images with a cr2 filename extension. My G3 used a crw filename extension.
So, what’s the difference between JPEG and raw and why worry about it? Well, there is – or can be – a lot of difference but you don’t have to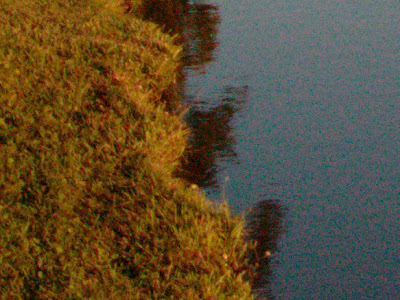.jpg) worry about it unless you want to. On the other hand, if you are concerned about maximizing image quality, developing a personal or customized look and generally pushing the limits of photography, then you should learn to process raw image files. The raw image file is sometimes described as the digital version of a (film) negative whereas the JPEG image coming straight out of the camera is more like a machine processed print from that negative. Although debatable and not strictly true, this description and comparison is easily understood. This picture is a 100% crop (click for larger view) from the raw file of a previously used scene; it has had no (as far as I can tell) post processing. Kind of ugly, fuzzy and noisy, isn't it?
worry about it unless you want to. On the other hand, if you are concerned about maximizing image quality, developing a personal or customized look and generally pushing the limits of photography, then you should learn to process raw image files. The raw image file is sometimes described as the digital version of a (film) negative whereas the JPEG image coming straight out of the camera is more like a machine processed print from that negative. Although debatable and not strictly true, this description and comparison is easily understood. This picture is a 100% crop (click for larger view) from the raw file of a previously used scene; it has had no (as far as I can tell) post processing. Kind of ugly, fuzzy and noisy, isn't it?
It is very important to realize that your camera makes its JPEG from the raw data in about a second or so. I call this image the "in-camera" JPEG. You can make your own JPEG from the raw file by using any editor that can read the proprietary raw file. This is what I do; of course, it takes me quite a bit longer than one second. So, most of the time, my final product is a JPEG file and, for my best efforts, a print made from that JPEG file.
One advantage of learning about raw image processing is that you are then entitled to participate in the endless debates about whether raw or JPEG is “best” or, for that matter, even worthwhile. In the great raw vs JPEG debate, when someone states that they've thoroughly investigated, studied and tested to come to the conclusion that JPEG is "good enough" or that their own JPEGs are "as good as" their own raw post processed images then I believe them. When someone states that they get better results using raw and post processing (my own experience) then I believe them as well.
(This is another post that will be continued and also used as a reference and link).
.
Shortly after pressing that shutter button, the internal computer chip in your digital camera begins to process the data collected by the sensor and then saves that data as a “picture” in the form of a data file on the memory card. Most likely, that data file is either a JPEG or a raw file format. JPEG is an acronym for Joint Photograpic Experts Group . JPEG files have “jpg” as the filename extension; for example, myfile.jpg is the filename of a JPEG image. Whereas JPEG files follow international standards, a raw file is proprietary to the particular camera manufacturer according to their needs. Therefore, many devices have software to read and process JPEG images but few can deal with raw images because all the raw image files are different.
In the case of the Canon G9, the raw image files have the filename extension cr2; for example, myfile.cr2 is (probably) a Canon raw image file. However, just because the filename has the .cr2 extension does not necessarily mean that it came from a Canon G9 camera because all the current Canon cameras having raw capability save their raw images with a cr2 filename extension. My G3 used a crw filename extension.
So, what’s the difference between JPEG and raw and why worry about it? Well, there is – or can be – a lot of difference but you don’t have to
.jpg) worry about it unless you want to. On the other hand, if you are concerned about maximizing image quality, developing a personal or customized look and generally pushing the limits of photography, then you should learn to process raw image files. The raw image file is sometimes described as the digital version of a (film) negative whereas the JPEG image coming straight out of the camera is more like a machine processed print from that negative. Although debatable and not strictly true, this description and comparison is easily understood. This picture is a 100% crop (click for larger view) from the raw file of a previously used scene; it has had no (as far as I can tell) post processing. Kind of ugly, fuzzy and noisy, isn't it?
worry about it unless you want to. On the other hand, if you are concerned about maximizing image quality, developing a personal or customized look and generally pushing the limits of photography, then you should learn to process raw image files. The raw image file is sometimes described as the digital version of a (film) negative whereas the JPEG image coming straight out of the camera is more like a machine processed print from that negative. Although debatable and not strictly true, this description and comparison is easily understood. This picture is a 100% crop (click for larger view) from the raw file of a previously used scene; it has had no (as far as I can tell) post processing. Kind of ugly, fuzzy and noisy, isn't it?It is very important to realize that your camera makes its JPEG from the raw data in about a second or so. I call this image the "in-camera" JPEG. You can make your own JPEG from the raw file by using any editor that can read the proprietary raw file. This is what I do; of course, it takes me quite a bit longer than one second. So, most of the time, my final product is a JPEG file and, for my best efforts, a print made from that JPEG file.
One advantage of learning about raw image processing is that you are then entitled to participate in the endless debates about whether raw or JPEG is “best” or, for that matter, even worthwhile. In the great raw vs JPEG debate, when someone states that they've thoroughly investigated, studied and tested to come to the conclusion that JPEG is "good enough" or that their own JPEGs are "as good as" their own raw post processed images then I believe them. When someone states that they get better results using raw and post processing (my own experience) then I believe them as well.
(This is another post that will be continued and also used as a reference and link).
.
Friday, December 28, 2007
G9: The Sweet Aperture
.
Many devices have a “sweet spot”; that is, a place, operational mode or setting where the device works best. Sports provide some of the best examples: baseball bats, tennis racquets and golf clubs all have a sweet spot (even if I could rarely find it!). Machines are the same way. Long ago I learned that a automobile engine runs best under conditions corresponding to a highway speed of something like 45 miles per hour. Wonder if that is still true? Centrifugal pumps certainly have a sweet spot; it’s even called the Best Efficiency Point (BEP). Generally speaking, when additional information is not available, I assume that the sweet spot of any device is near the middle of its operating range. The end points of an operating range are typically compromises in some way or other.
The G9 aperture can be varied between f2.8 and f8. The sweet spot in this range is somewhere between f4 and f5. After a few tests, I’d say that the sweet aperture of my own G9 is about f4.5.
A simple test was set up as shown here with a ruler on a table in window light. The G9 was on a tripod, in Manual exposure mode, shooting raw + jpg at ISO 80 and set for the 2 second shutter delay to avoid camera shake. The coins were placed along the ruler for reference points. After determining the correct exposure, pictures were taken at various apertures (changing shutter speed to keep correct exposure). The focus was obtained automatically at the penny but I was concerned about the effects of focus so all tests were repeated using focus bracketing; however, this turned out to be unnecessary.
Here is a composite of the crops from the in-camera jpgs..jpg) Several things are going on here and all at the same time. The exposures vary a little bit and the outdoor window light also varied somewhat. As expected, depth of field increased as the aperture decreased (f-number increased). Some sort of in-camera sharpening, contrast, etc is being done as well. All these images look reasonable and about the same at first glance. Now click on the image to get the 100% crop view. Take a close look at the scale markings of the f4.5 variation at the penny. The scale graduations are in 1/64 inch and every graduation is visible. Two inches closer to the camera, near the nickel, the f5 version shows more detail and the f4 version shows the least detail. This is the effect of depth of field. The same effect should be seen near the dime at the 8 inch mark – the most detail in the f5 shot. But wait! The f5 shot is worse than the f4.5 shot. Notice that details of the graduations are visible out to about 7-32/64 on the f4.5 shot but only about 16/64 on the f4 and f5 shot. What is going on here?
Several things are going on here and all at the same time. The exposures vary a little bit and the outdoor window light also varied somewhat. As expected, depth of field increased as the aperture decreased (f-number increased). Some sort of in-camera sharpening, contrast, etc is being done as well. All these images look reasonable and about the same at first glance. Now click on the image to get the 100% crop view. Take a close look at the scale markings of the f4.5 variation at the penny. The scale graduations are in 1/64 inch and every graduation is visible. Two inches closer to the camera, near the nickel, the f5 version shows more detail and the f4 version shows the least detail. This is the effect of depth of field. The same effect should be seen near the dime at the 8 inch mark – the most detail in the f5 shot. But wait! The f5 shot is worse than the f4.5 shot. Notice that details of the graduations are visible out to about 7-32/64 on the f4.5 shot but only about 16/64 on the f4 and f5 shot. What is going on here?
Remember, I was shooting raw + jpg but taking the easy way out and using the in-camera jpg to draw conclusions. Time to examine the raw files. The raw files led to exactly the same conclusion: f4.5 is the sweet aperture for the G9. The raw files also revealed much more detail than the in-camera jpgs. In this composite (click for an enlargement), the f4.5 crop from raw (middle) reveals detail out to about the 8-8/64 inch mark. But notice that the f8 crop from raw (right) shows even less detail than the f4.5 crop from the in-camera jpg. In fact, the f8 crop from raw is noticably soft along the entire length. These are unexpected results except for the concept of the “sweet spot”.
What is the technical explanation for this sweet spot near f4.5 for the G9? The answer to this question appears to be related to the diffraction limit. I’m certainly no expert in diffraction but here are some handy links for a more detailed explanation and even some calculations.
Wikipedia has a detailed explanation of diffraction.
There is a good explanation of diffraction in digital photography and even a calculator to estimate the limiting aperture at http://www.cambridgeincolour.com/tutorials/digital-camera-sensor-size.htm.
In a final comparison, instead of the 100% pixel peeping monitor view, I made 8x10 sized, full frame matte prints on a Canon i9100 printer. Near the 8 inch mark, the 1/64 graduations are not detectable with the unaided eye from any of the variations! Even so, the f4.5 print from raw is obviously preferable to the others.
When the absolute maximum quality image is required, I’ll be tending to shoot my G9 at f4.5 but the larger and smaller apertures are still very useable – and I do drive faster (and slower) than 45 mph!
Note: Knowing I would be writing that raw revealed more details than jpg, and anticipating the grief that would come my way for doing so, I suddenly remembered that when the G9 is set for raw + jpg, the in-camera jpg is compressed at the “Fine” level whereas in pure jpg mode the “Super Fine” compression is available. I repeated the test shots in jpg only, using “Super Fine” compression mode. The results are the same: f4.5 is the sweet spot and raw reveals more detail than jpg; however, Super Fine compression does reveal slightly more detail than Fine compression. I believe that the difference in the raw and jpg shots is not “raw vs jpg” but is instead an indication of the in-camera noise reduction that is done on the in-camera jpg even at ISO 80. The raw file did not have any noise reduction applied. Should noise reduction have been applied to the raw files? Well, you were looking at 100% crops, would you apply noise reduction?
Many devices have a “sweet spot”; that is, a place, operational mode or setting where the device works best. Sports provide some of the best examples: baseball bats, tennis racquets and golf clubs all have a sweet spot (even if I could rarely find it!). Machines are the same way. Long ago I learned that a automobile engine runs best under conditions corresponding to a highway speed of something like 45 miles per hour. Wonder if that is still true? Centrifugal pumps certainly have a sweet spot; it’s even called the Best Efficiency Point (BEP). Generally speaking, when additional information is not available, I assume that the sweet spot of any device is near the middle of its operating range. The end points of an operating range are typically compromises in some way or other.
The G9 aperture can be varied between f2.8 and f8. The sweet spot in this range is somewhere between f4 and f5. After a few tests, I’d say that the sweet aperture of my own G9 is about f4.5.
A simple test was set up as shown here with a ruler
 on a table in window light. The G9 was on a tripod, in Manual exposure mode, shooting raw + jpg at ISO 80 and set for the 2 second shutter delay to avoid camera shake. The coins were placed along the ruler for reference points. After determining the correct exposure, pictures were taken at various apertures (changing shutter speed to keep correct exposure). The focus was obtained automatically at the penny but I was concerned about the effects of focus so all tests were repeated using focus bracketing; however, this turned out to be unnecessary.
Here is a composite of the crops from the in-camera jpgs.
.jpg) Several things are going on here and all at the same time. The exposures vary a little bit and the outdoor window light also varied somewhat. As expected, depth of field increased as the aperture decreased (f-number increased). Some sort of in-camera sharpening, contrast, etc is being done as well. All these images look reasonable and about the same at first glance. Now click on the image to get the 100% crop view. Take a close look at the scale markings of the f4.5 variation at the penny. The scale graduations are in 1/64 inch and every graduation is visible. Two inches closer to the camera, near the nickel, the f5 version shows more detail and the f4 version shows the least detail. This is the effect of depth of field. The same effect should be seen near the dime at the 8 inch mark – the most detail in the f5 shot. But wait! The f5 shot is worse than the f4.5 shot. Notice that details of the graduations are visible out to about 7-32/64 on the f4.5 shot but only about 16/64 on the f4 and f5 shot. What is going on here?
Several things are going on here and all at the same time. The exposures vary a little bit and the outdoor window light also varied somewhat. As expected, depth of field increased as the aperture decreased (f-number increased). Some sort of in-camera sharpening, contrast, etc is being done as well. All these images look reasonable and about the same at first glance. Now click on the image to get the 100% crop view. Take a close look at the scale markings of the f4.5 variation at the penny. The scale graduations are in 1/64 inch and every graduation is visible. Two inches closer to the camera, near the nickel, the f5 version shows more detail and the f4 version shows the least detail. This is the effect of depth of field. The same effect should be seen near the dime at the 8 inch mark – the most detail in the f5 shot. But wait! The f5 shot is worse than the f4.5 shot. Notice that details of the graduations are visible out to about 7-32/64 on the f4.5 shot but only about 16/64 on the f4 and f5 shot. What is going on here?Remember, I was shooting raw + jpg but taking
 the easy way out and using the in-camera jpg to draw conclusions. Time to examine the raw files. The raw files led to exactly the same conclusion: f4.5 is the sweet aperture for the G9. The raw files also revealed much more detail than the in-camera jpgs. In this composite (click for an enlargement), the f4.5 crop from raw (middle) reveals detail out to about the 8-8/64 inch mark. But notice that the f8 crop from raw (right) shows even less detail than the f4.5 crop from the in-camera jpg. In fact, the f8 crop from raw is noticably soft along the entire length. These are unexpected results except for the concept of the “sweet spot”.
What is the technical explanation for this sweet spot near f4.5 for the G9? The answer to this question appears to be related to the diffraction limit. I’m certainly no expert in diffraction but here are some handy links for a more detailed explanation and even some calculations.
Wikipedia has a detailed explanation of diffraction.
There is a good explanation of diffraction in digital photography and even a calculator to estimate the limiting aperture at http://www.cambridgeincolour.com/tutorials/digital-camera-sensor-size.htm.
In a final comparison, instead of the 100% pixel peeping monitor view, I made 8x10 sized, full frame matte prints on a Canon i9100 printer. Near the 8 inch mark, the 1/64 graduations are not detectable with the unaided eye from any of the variations! Even so, the f4.5 print from raw is obviously preferable to the others.
When the absolute maximum quality image is required, I’ll be tending to shoot my G9 at f4.5 but the larger and smaller apertures are still very useable – and I do drive faster (and slower) than 45 mph!
Note: Knowing I would be writing that raw revealed more details than jpg, and anticipating the grief that would come my way for doing so, I suddenly remembered that when the G9 is set for raw + jpg, the in-camera jpg is compressed at the “Fine” level whereas in pure jpg mode the “Super Fine” compression is available. I repeated the test shots in jpg only, using “Super Fine” compression mode. The results are the same: f4.5 is the sweet spot and raw reveals more detail than jpg; however, Super Fine compression does reveal slightly more detail than Fine compression. I believe that the difference in the raw and jpg shots is not “raw vs jpg” but is instead an indication of the in-camera noise reduction that is done on the in-camera jpg even at ISO 80. The raw file did not have any noise reduction applied. Should noise reduction have been applied to the raw files? Well, you were looking at 100% crops, would you apply noise reduction?
Sunday, November 4, 2007
Comparison: G3, G9, S5, SD800, 20D
.jpg)
+(web).jpg)
Suppose you come upon a well lit scene and simply raise your camera to your eye and get a snapshot. Which camera would be best? I gathered a Canon SD800IS, an S5IS and a 20D along with my G3 and G9 and attempted to make a comparison.
Once again, I’m impressed by the “rules” that must be made up for the comparison game. This time, the rules are: no special exposure, no special focusing, use low ISO setting, no tripod, compare the in-camera jpg images. Although all the comparative images came out OK, I probably should have used a tripod just to eliminate that variable. Also, because it is my normal practice, I shot in Aperture Priority (Av) mode.
My original intention was to post the various images and elaborate on the differences. As I viewed the various shots on my monitor, I realized that they were all the same. Well, almost the same, anyway. Especially at full screen size. I printed them on an Epson 2200 printer – the same. I printed them on a Canon i9000 printer – the same (but different from the Epson). Different papers – the same (but different paper to paper).
Of course, when I processed the RAW files (couldn’t resist getting RAW from the G3, G9 and 20D) then those images should be different from the in-camera jpgs. And they were. The ones that I over-exposed in Adobe Camera Raw (ACR) were too bright. The ones that I over-saturated or over-sharpened were, well, over-saturated or over-sharpened. I combined an overexposure and underexposure in an attempt to get more detail but didn’t like it. All in all, for this particular scene and for the first pass attempts in ACR processing, the in-camera jpgs were fine – and that goes for all the cameras.
The picture posted above is from a Canon S5 IS. The G3, G9 and SD800IS look very similar – and why not? These images are all “designed” by Canon’s marketing teams and engineers (I’m making this all up but you get the idea) to be pleasing to the purchaser – on average. Realistically, you have to expect the in-camera jpg images from these Canon products to be very similar.
On the other hand, the 20D image was very different (remember,+(web).jpg) we’re talking about an in-camera jpg). The 20D has a CMOS sensor instead of the CCD used in the G3, G9, SD800 and S5. The 20D, a DSLR, is targeted at a different market. The obvious difference that I observed is more related to color saturation than anything else. That is, the 20D image was less saturated; however, this is actually a consequence of the 20D settings that I had personally established.
we’re talking about an in-camera jpg). The 20D has a CMOS sensor instead of the CCD used in the G3, G9, SD800 and S5. The 20D, a DSLR, is targeted at a different market. The obvious difference that I observed is more related to color saturation than anything else. That is, the 20D image was less saturated; however, this is actually a consequence of the 20D settings that I had personally established.
I tried to be objective. I waited days between comparisons. I showed the prints to quite a few people. These images, whether viewed on screen or printed to 8x10 are all essentially the same. I’ll venture to say that, based on these images alone, almost anyone would be happy with any of the cameras that I “tested”. Strangely enough, most people preferred the over-saturated in-camera jpgs of the digicams to the more realistic 20D version. In fact, I have to admit that my own preferences (based on processing the RAW files) look more like the digicam in-camera jpg than the more realistic 20D in-camera jpg. No doubt those preferences are a sign of the times.
My conclusion? For front-lit simple landscapes, any of the higher end Canon digicams produce about the same image. A more realistic image is made by the 20D DSLR. All produce an acceptable image when printed at 8x10 inches.
Once again, I’m impressed by the “rules” that must be made up for the comparison game. This time, the rules are: no special exposure, no special focusing, use low ISO setting, no tripod, compare the in-camera jpg images. Although all the comparative images came out OK, I probably should have used a tripod just to eliminate that variable. Also, because it is my normal practice, I shot in Aperture Priority (Av) mode.
My original intention was to post the various images and elaborate on the differences. As I viewed the various shots on my monitor, I realized that they were all the same. Well, almost the same, anyway. Especially at full screen size. I printed them on an Epson 2200 printer – the same. I printed them on a Canon i9000 printer – the same (but different from the Epson). Different papers – the same (but different paper to paper).
Of course, when I processed the RAW files (couldn’t resist getting RAW from the G3, G9 and 20D) then those images should be different from the in-camera jpgs. And they were. The ones that I over-exposed in Adobe Camera Raw (ACR) were too bright. The ones that I over-saturated or over-sharpened were, well, over-saturated or over-sharpened. I combined an overexposure and underexposure in an attempt to get more detail but didn’t like it. All in all, for this particular scene and for the first pass attempts in ACR processing, the in-camera jpgs were fine – and that goes for all the cameras.
The picture posted above is from a Canon S5 IS. The G3, G9 and SD800IS look very similar – and why not? These images are all “designed” by Canon’s marketing teams and engineers (I’m making this all up but you get the idea) to be pleasing to the purchaser – on average. Realistically, you have to expect the in-camera jpg images from these Canon products to be very similar.
On the other hand, the 20D image was very different (remember,
+(web).jpg) we’re talking about an in-camera jpg). The 20D has a CMOS sensor instead of the CCD used in the G3, G9, SD800 and S5. The 20D, a DSLR, is targeted at a different market. The obvious difference that I observed is more related to color saturation than anything else. That is, the 20D image was less saturated; however, this is actually a consequence of the 20D settings that I had personally established.
we’re talking about an in-camera jpg). The 20D has a CMOS sensor instead of the CCD used in the G3, G9, SD800 and S5. The 20D, a DSLR, is targeted at a different market. The obvious difference that I observed is more related to color saturation than anything else. That is, the 20D image was less saturated; however, this is actually a consequence of the 20D settings that I had personally established.I tried to be objective. I waited days between comparisons. I showed the prints to quite a few people. These images, whether viewed on screen or printed to 8x10 are all essentially the same. I’ll venture to say that, based on these images alone, almost anyone would be happy with any of the cameras that I “tested”. Strangely enough, most people preferred the over-saturated in-camera jpgs of the digicams to the more realistic 20D version. In fact, I have to admit that my own preferences (based on processing the RAW files) look more like the digicam in-camera jpg than the more realistic 20D in-camera jpg. No doubt those preferences are a sign of the times.
My conclusion? For front-lit simple landscapes, any of the higher end Canon digicams produce about the same image. A more realistic image is made by the 20D DSLR. All produce an acceptable image when printed at 8x10 inches.
My personal choice? I’ve learned enough about the G9 to know that if image quality, especially enlarged prints, is the criteria, then I’m going to use the 20D. At the same time, for these particular images, I’ll give the edge, albeit a slight one, to the G9. Whether from the in-camera jpg or a processed RAW file, I consistently picked the G9 images as my favorites. I attempted to forget, to be objective, etc., etc. but the G9 just takes good pictures.
Subscribe to:
Posts (Atom)