There are entire books about Adobe Camera Raw (ACR). I’m currently using Camera Raw by Fraser and Schewe as a reference; however, it doesn’t give specific settings for the G9. I probably shouldn’t either but many people need a starting point (well, I did). On opening a image in ACR, there are eight panels of controls but I’m giving starting points for only a few. For now, leave the other controls on default or automatic.
First of all, ACR will open your raw file according to the Default settings until you make changes. Also, ACR applies a profile that is specific to your camera make and model. There’s no such thing as opening the raw file in ACR and then saving it as “unprocessed”.
A tip: Holding down the Alt (Windows) or Option (Mac) key while moving the sliders is revealing for some (not all) of the controls.

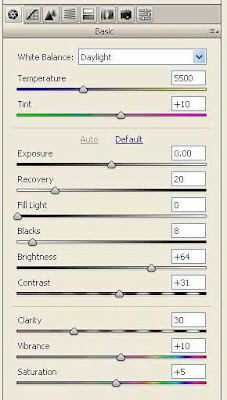
The settings for the first panel, “Basic”, aren’t particularly specific to the G9. These settings will vary a lot and according to your tastes. These are:
White Balance (temperature and tint) is probably obvious and has been previously posted.
Exposure, Recovery, Fill Light, Blacks, Brightness, Contrast: Click the Auto button and see what happens; you’ll probably like it. If not, start moving the sliders but keep an eye on the histogram. “Recovery” attempts to recover highlight detail and is really useful. “Fill Light” attempts to recover shadow details. Extremes are usually not good.
Clarity boosts midtone contrast; I usually have it between 20 and 50.
Vibrance increases color saturation without oversaturating skin tones. I typically set Vibrance between 5 and 10 and use a lesser amount for the Saturation slider setting. It is very tempting and very easy to oversaturate!

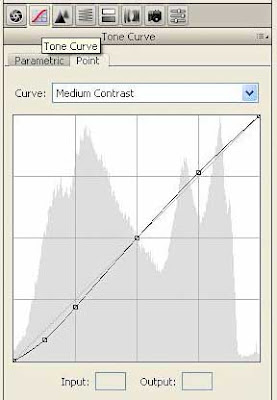
The second panel, “Curve Tone”, is also more specific to the image than to the G9. I almost always leave all the Parametric settings at 0, change to the Point settings and select “Medium Contrast” from the drop-down list. I may then refine or even completely change the curve; it is similar to the Photoshop curve adjustment.
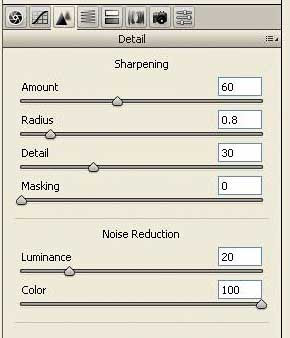
The “Detail” panel is where specifics come into play for the G9 for both sharpening and noise reduction. Sharpening at this stage of post processing is “capture” sharpening specific to the camera. Later, creative sharpening might be applied. Output sharpening should be specific to the printer, paper, screen, etc. The Detail panel also contains two settings for noise reduction. For the most part, after quite a bit of comparative testing, I use the settings recommended by Thomas Niemann . For ISO 80 and 100, these are:
Amount: 60

Radius: .8
Detail: 30
Masking: 0
Luminance: 20
Color: 100
For ISO 800, I usually try Luminance set at 80 as recommended by Thomas Niemann but sometimes this high luminance value squashes detail. For ISO between 100 and 800, I try Luminance settings between 20 and 80. Noise is a bit of a problem with the G9 - especially above ISO 200. but higher ISO is usable with suitable noise reduction techniques. I've written already about noise reduction and will be doing more as I learn more myself.
Again, these are starting points. There are many other controls in ACR and eventually I’ll feel confident enough to comment on them.
.
1 comment:
Thanks for this very useful post; i appreciate the effort!
Post a Comment