.
The G9 has a Wiki! In fact, the entire Powershot G series of cameras has a Wiki.
A Wiki is a collaborative informative article. You’ve probably heard of “Wikipedia” – the free, online encyclopedia. Well, Wikipedia now includes a Powershot G article. Check it out; in fact, contribute to it!
.
Friday, February 29, 2008
Friday, February 22, 2008
G9: Balancing Outdoor Exposure with Indoor Flash Automatically
.
With the G9 and Canon ETTL flash you can get a good balance between outdoor and indoor lighting on the first attempt! Well, the camera exposure and flash exposure will be set automatically and produce a good shot the first time but you’ll have to follow this procedure and have good manual dexterity.
1. Set the G9 to either P, Tv or Av mode. (I’d use Tv at 1/250 second.)
2. Get the main subject in focus and switch to manual focus mode to lock focus.
3. Point the G9 towards the outdoor scene and press the shutter button halfway to lock in the outdoor exposure. HOLD the shutter button halfway down.
4. Point the G9 at the main indoor subject and trigger the preflash by pressing the * button while still holding the shutter button halfway down (like I said, good manual dexterity required!). No need to hold the * button down.
5. Still holding the shutter button halfway down, make the final composition and complete the shutter button press.
By following the above procedure, the G9 is set for outdoor exposure, the flash uses ETTL to determine the indoor exposure based on the main subject and the main subject is in focus.
Simple, right?
Oh, if you need a second shot just repeat Steps 3, 4 and 5.
With the G9, it’s really easier to use complete manual control to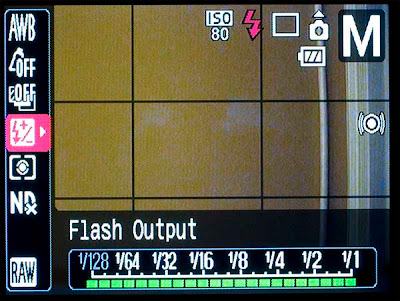.jpg) balance outdoor and indoor light – even with Canon flash. Set the G9 to Manual exposure and dial in both shutter speed and aperture for the outdoor exposure -- (experience, the Sunny G9 rule, or use the G9 as a light meter). With the Canon flash on ETTL, press the G9 function button and scroll down to the flash settings. Take a guess and fire a test shot. Adjust if necessary. After you are dialed in, fire away!
balance outdoor and indoor light – even with Canon flash. Set the G9 to Manual exposure and dial in both shutter speed and aperture for the outdoor exposure -- (experience, the Sunny G9 rule, or use the G9 as a light meter). With the Canon flash on ETTL, press the G9 function button and scroll down to the flash settings. Take a guess and fire a test shot. Adjust if necessary. After you are dialed in, fire away!
.
With the G9 and Canon ETTL flash you can get a good balance between outdoor and indoor lighting on the first attempt! Well, the camera exposure and flash exposure will be set automatically and produce a good shot the first time but you’ll have to follow this procedure and have good manual dexterity.
1. Set the G9 to either P, Tv or Av mode. (I’d use Tv at 1/250 second.)
2. Get the main subject in focus and switch to manual focus mode to lock focus.
3. Point the G9 towards the outdoor scene and press the shutter button halfway to lock in the outdoor exposure. HOLD the shutter button halfway down.
4. Point the G9 at the main indoor subject and trigger the preflash by pressing the * button while still holding the shutter button halfway down (like I said, good manual dexterity required!). No need to hold the * button down.
5. Still holding the shutter button halfway down, make the final composition and complete the shutter button press.
By following the above procedure, the G9 is set for outdoor exposure, the flash uses ETTL to determine the indoor exposure based on the main subject and the main subject is in focus.
Simple, right?
Oh, if you need a second shot just repeat Steps 3, 4 and 5.
With the G9, it’s really easier to use complete manual control to
.jpg) balance outdoor and indoor light – even with Canon flash. Set the G9 to Manual exposure and dial in both shutter speed and aperture for the outdoor exposure -- (experience, the Sunny G9 rule, or use the G9 as a light meter). With the Canon flash on ETTL, press the G9 function button and scroll down to the flash settings. Take a guess and fire a test shot. Adjust if necessary. After you are dialed in, fire away!
balance outdoor and indoor light – even with Canon flash. Set the G9 to Manual exposure and dial in both shutter speed and aperture for the outdoor exposure -- (experience, the Sunny G9 rule, or use the G9 as a light meter). With the Canon flash on ETTL, press the G9 function button and scroll down to the flash settings. Take a guess and fire a test shot. Adjust if necessary. After you are dialed in, fire away!.
Sunday, February 17, 2008
Camera Raw Settings for the G9
.
There are entire books about Adobe Camera Raw (ACR). I’m currently using Camera Raw by Fraser and Schewe as a reference; however, it doesn’t give specific settings for the G9. I probably shouldn’t either but many people need a starting point (well, I did). On opening a image in ACR, there are eight panels of controls but I’m giving starting points for only a few. For now, leave the other controls on default or automatic.
First of all, ACR will open your raw file according to the Default settings until you make changes. Also, ACR applies a profile that is specific to your camera make and model. There’s no such thing as opening the raw file in ACR and then saving it as “unprocessed”.
A tip: Holding down the Alt (Windows) or Option (Mac) key while moving the sliders is revealing for some (not all) of the controls.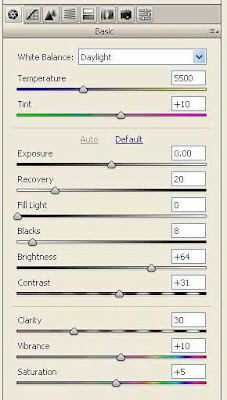
The settings for the first panel, “Basic”, aren’t particularly specific to the G9. These settings will vary a lot and according to your tastes. These are:
White Balance (temperature and tint) is probably obvious and has been previously posted.
Exposure, Recovery, Fill Light, Blacks, Brightness, Contrast: Click the Auto button and see what happens; you’ll probably like it. If not, start moving the sliders but keep an eye on the histogram. “Recovery” attempts to recover highlight detail and is really useful. “Fill Light” attempts to recover shadow details. Extremes are usually not good.
Clarity boosts midtone contrast; I usually have it between 20 and 50.
Vibrance increases color saturation without oversaturating skin tones. I typically set Vibrance between 5 and 10 and use a lesser amount for the Saturation slider setting. It is very tempting and very easy to oversaturate!
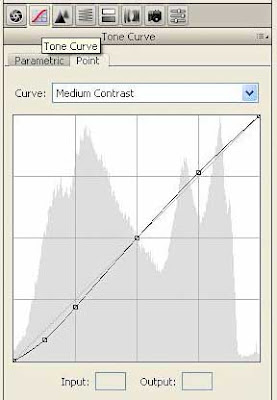
The second panel, “Curve Tone”, is also more specific to the image than to the G9. I almost always leave all the Parametric settings at 0, change to the Point settings and select “Medium Contrast” from the drop-down list. I may then refine or even completely change the curve; it is similar to the Photoshop curve adjustment.
The “Detail” panel is where specifics come into play for the G9 for both sharpening and noise reduction. Sharpening at this stage of post processing is “capture” sharpening specific to the camera. Later, creative sharpening might be applied. Output sharpening should be specific to the printer, paper, screen, etc. The Detail panel also contains two settings for noise reduction. For the most part, after quite a bit of comparative testing, I use the settings recommended by Thomas Niemann . For ISO 80 and 100, these are:
Amount: 60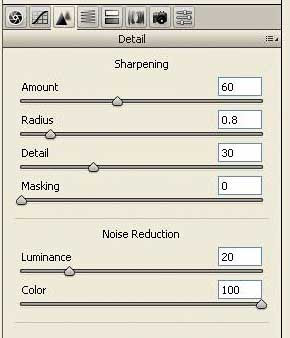
Radius: .8
Detail: 30
Masking: 0
Luminance: 20
Color: 100
For ISO 800, I usually try Luminance set at 80 as recommended by Thomas Niemann but sometimes this high luminance value squashes detail. For ISO between 100 and 800, I try Luminance settings between 20 and 80. Noise is a bit of a problem with the G9 - especially above ISO 200. but higher ISO is usable with suitable noise reduction techniques. I've written already about noise reduction and will be doing more as I learn more myself.
Again, these are starting points. There are many other controls in ACR and eventually I’ll feel confident enough to comment on them.
.
There are entire books about Adobe Camera Raw (ACR). I’m currently using Camera Raw by Fraser and Schewe as a reference; however, it doesn’t give specific settings for the G9. I probably shouldn’t either but many people need a starting point (well, I did). On opening a image in ACR, there are eight panels of controls but I’m giving starting points for only a few. For now, leave the other controls on default or automatic.
First of all, ACR will open your raw file according to the Default settings until you make changes. Also, ACR applies a profile that is specific to your camera make and model. There’s no such thing as opening the raw file in ACR and then saving it as “unprocessed”.
A tip: Holding down the Alt (Windows) or Option (Mac) key while moving the sliders is revealing for some (not all) of the controls.

The settings for the first panel, “Basic”, aren’t particularly specific to the G9. These settings will vary a lot and according to your tastes. These are:
White Balance (temperature and tint) is probably obvious and has been previously posted.
Exposure, Recovery, Fill Light, Blacks, Brightness, Contrast: Click the Auto button and see what happens; you’ll probably like it. If not, start moving the sliders but keep an eye on the histogram. “Recovery” attempts to recover highlight detail and is really useful. “Fill Light” attempts to recover shadow details. Extremes are usually not good.
Clarity boosts midtone contrast; I usually have it between 20 and 50.
Vibrance increases color saturation without oversaturating skin tones. I typically set Vibrance between 5 and 10 and use a lesser amount for the Saturation slider setting. It is very tempting and very easy to oversaturate!

The second panel, “Curve Tone”, is also more specific to the image than to the G9. I almost always leave all the Parametric settings at 0, change to the Point settings and select “Medium Contrast” from the drop-down list. I may then refine or even completely change the curve; it is similar to the Photoshop curve adjustment.
The “Detail” panel is where specifics come into play for the G9 for both sharpening and noise reduction. Sharpening at this stage of post processing is “capture” sharpening specific to the camera. Later, creative sharpening might be applied. Output sharpening should be specific to the printer, paper, screen, etc. The Detail panel also contains two settings for noise reduction. For the most part, after quite a bit of comparative testing, I use the settings recommended by Thomas Niemann . For ISO 80 and 100, these are:
Amount: 60

Radius: .8
Detail: 30
Masking: 0
Luminance: 20
Color: 100
For ISO 800, I usually try Luminance set at 80 as recommended by Thomas Niemann but sometimes this high luminance value squashes detail. For ISO between 100 and 800, I try Luminance settings between 20 and 80. Noise is a bit of a problem with the G9 - especially above ISO 200. but higher ISO is usable with suitable noise reduction techniques. I've written already about noise reduction and will be doing more as I learn more myself.
Again, these are starting points. There are many other controls in ACR and eventually I’ll feel confident enough to comment on them.
.
Friday, February 15, 2008
Recent G9 Reviews and Information
.
In addition to Nick Devlin’s recent fun read and excellent article about a user's experience with the Canon G9, there is an ongoing review and diary at Outback Photo by Uwe Steinmueller, Paul Nakroshis and Alain Briot. Today, Alain Briot added his impressions and experiences to that diary.
For those of us involved in the never-ending search for a small external flash fo the G9, Hyun Yu reported on his experience with the Metz Mecablitz 20 C-2 flash at Dpreview. Siegfried Seierlein has information about several small flashes, expecially the Canon 220EX, for the G9 on his MyCanonG7 site.
.
Monday, February 11, 2008
G9 and Raw
.
Unlike most digicams, the Canon G9 can produce “raw” files. For many photographers, the ability to generate a raw file is one of the main reasons for selecting the G9. Even so, the usefulness and quality of raw vs JPEG is an ongoing debate and probably will always be an issue. As noted in other postings, JPEG is a very versatile and useful format. For the most part, the raw vs JPEG debate is really about the in-camera JPEG and its potential as compared to the raw – that is, unprocessed -- data from the sensor.jpg)
If the in-camera JPEG produced by the G9 is analogous to using slide film then the raw image is analogous to using negative film. That’s why a raw file is sometimes referred to as a digital negative. Both negatives and raw files must receive further processing before a print can be made and those prints are highly customizable as well as highly dependent on the tools and skills of the user. This image, a crop from a previous illustration, is an example of an unprocessed raw file.
In comparison to the 8 bit JPEG, raw files are 16 bit data files; however, it turns out that all those bits are not actually used. For example, the Canon G9 produces 12 bit data files but places those in a 16 bit “wrapper”. Still, there is more information in a G9 raw file than in a G9 in-camera JPEG file. Although file size can be misleading (both are compressed), take a look at raw and JPEG files. Information has been discarded from the raw file in order to create the smaller JPEG file.
It is important to understand that the in-camera JPEG is made from the raw data in a second or two (and perhaps a fraction of a second) by the in-camera computer. The details of that JPEG -- tonality, contrast, saturation, sharpening, noise reduction, etc. -- were determined by a committee of marketers and engineers except for any tweaking that you toss in as in-camera options.
If your goal, whether in general or for a particular photograph, is to squeeze every possible pixel of quality from your camera, then you should shoot in raw mode and learn to process the raw data file.
My own preference is to shoot in raw mode and to process the raw file in Photoshop (more accurately Adobe Camera Raw – usually abbreviated as ACR). There are several other editing/conversion programs that will work with the G9 data files. Canon even includes some software, Raw Image Task (RIT) with the G9. Some of the other G9 raw image processors, include:
DCRaw is a command line program/module said to be the basis of many other programs
UFRaw provides a user interface to DCRaw and adds features
Bibble is more than raw conversion, includes other features such as noise reduction
BreezeBrowser is one of my most used tools, but it has not yet been updated for G9 raw files.
I don’t use any of the above programs for raw conversion except for ACR. In the next post, I’ll give examples of starting point settings in ACR for G9 raw files.
.
Unlike most digicams, the Canon G9 can produce “raw” files. For many photographers, the ability to generate a raw file is one of the main reasons for selecting the G9. Even so, the usefulness and quality of raw vs JPEG is an ongoing debate and probably will always be an issue. As noted in other postings, JPEG is a very versatile and useful format. For the most part, the raw vs JPEG debate is really about the in-camera JPEG and its potential as compared to the raw – that is, unprocessed -- data from the sensor
.jpg)
If the in-camera JPEG produced by the G9 is analogous to using slide film then the raw image is analogous to using negative film. That’s why a raw file is sometimes referred to as a digital negative. Both negatives and raw files must receive further processing before a print can be made and those prints are highly customizable as well as highly dependent on the tools and skills of the user. This image, a crop from a previous illustration, is an example of an unprocessed raw file.
In comparison to the 8 bit JPEG, raw files are 16 bit data files; however, it turns out that all those bits are not actually used. For example, the Canon G9 produces 12 bit data files but places those in a 16 bit “wrapper”. Still, there is more information in a G9 raw file than in a G9 in-camera JPEG file. Although file size can be misleading (both are compressed), take a look at raw and JPEG files. Information has been discarded from the raw file in order to create the smaller JPEG file.
It is important to understand that the in-camera JPEG is made from the raw data in a second or two (and perhaps a fraction of a second) by the in-camera computer. The details of that JPEG -- tonality, contrast, saturation, sharpening, noise reduction, etc. -- were determined by a committee of marketers and engineers except for any tweaking that you toss in as in-camera options.
If your goal, whether in general or for a particular photograph, is to squeeze every possible pixel of quality from your camera, then you should shoot in raw mode and learn to process the raw data file.
My own preference is to shoot in raw mode and to process the raw file in Photoshop (more accurately Adobe Camera Raw – usually abbreviated as ACR). There are several other editing/conversion programs that will work with the G9 data files. Canon even includes some software, Raw Image Task (RIT) with the G9. Some of the other G9 raw image processors, include:
DCRaw is a command line program/module said to be the basis of many other programs
UFRaw provides a user interface to DCRaw and adds features
Bibble is more than raw conversion, includes other features such as noise reduction
BreezeBrowser is one of my most used tools, but it has not yet been updated for G9 raw files.
I don’t use any of the above programs for raw conversion except for ACR. In the next post, I’ll give examples of starting point settings in ACR for G9 raw files.
.
Friday, February 8, 2008
G9 at Outback
.
There is a yet another hands on review of the Canon G9 at Outback Photo in the form of an ongoing diary. However, this review is a little bit different in that the reviewers, Uwe Steinmueller and Alain Briot, normally use DSLR or large format cameras but have succumbed to the G9 for its portability. Also, this review is on-going so let's keep checking for their latest experiences!
.
Monday, February 4, 2008
Fine Tuning the G9 JPEG
.
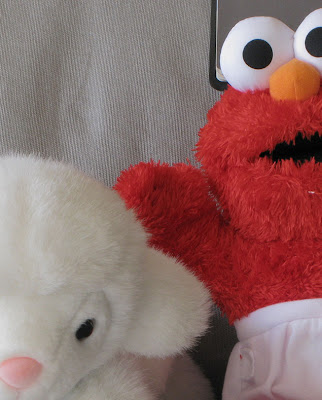
Next, I “softened” the G9 settings by minimizing the contrast, sharpening and saturation. The result is as expected. These minimums are popular starting points when the JPEG file is to be post processed. This image is downsized to 50% and cropped so that some details can be checked (click for larger image).
Finally, I went to the extreme settings for contrast, sharpening and saturation.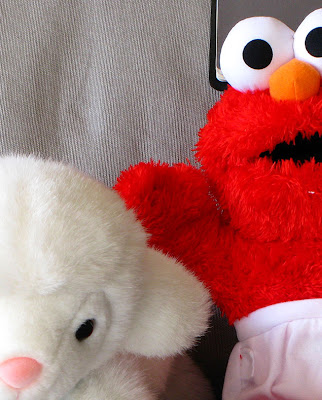 This image is downsized and cropped as above. One unexpected result was the file size. Using the “normal” settings, the file size was 4 KB; the file size for the soft, desaturated image was 3.4 KB; the file size for the extremes was 4.5 KB. Otherwise, the results are as expected but at least now I have some feeling for those extremes.
On examining the files in BreezeBrowser and Photoshop, I was surprised that none of the special My Colors settings were retained in the file data. So if you try similar experiments, be sure to take notes.
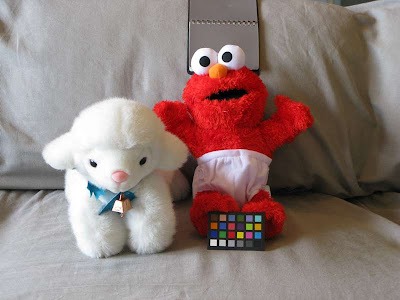
A lot can be learned with a simple setup. The above image of Elmo and Kitty-Cow is a good example. Sure, if you’d happened upon this scene, you’d probably fire away on full auto (and get a flash photo) but a more methodical process can be very educational. In particular, I wanted to try my hand at fine tuning the in-camera JPEG settings. Besides, this was a chance to use the new cable release as well (worked great).
The above scene was lit with mixed lighting: sunlight through a window at left plus direct overhead tungsten. What is the correct white balance setting? I tossed in a old gray card for reference.
What about exposure? Light meters assume neutral gray but a Kitty-Cow is white (there are black kitty-cows but, technically, these are bear-dogs). The couch is nearly neutral and Elmo is, of course, quite colorful. I often begin a shoot in aperture mode (Av) and use the camera as a light meter. With the G9 at ISO 100, Av mode at f4.8, zoomed out all the way and set for spot metering, the “correct” exposure varied a lot as I panned over the scene. Kitty-Cow wanted 1/15 second; Elmo 1/4; the couch 1/6 and the gray card 1/5. So this is a good example of how a white object affects a light meter reading: about 1 to 2 stops off. Shifting to Program mode (P) and using evaluative metering on the complete scene, the G9 would like to take this picture at 1/13 second and f3.5. This (Program and evaluative) exposure is essentially the same as that obtained by metering the gray card or couch. In practice, I find evaluative metering to be very good so my G9 is almost always in evaluative metering mode.
What about the white balance for this mixed lighting? Using the G9 white balance options, I made two custom white balances: Custom1 was based on the gray card; Custom2 was based on the couch. Later on, based on a raw file, Photoshop said that the G9 auto white balance was at 4100K with +4 tint. Photoshop preferred 3950 and 0 tint in its own auto mode. According to Photoshop, my G9 Custom1 is at 3900, -13 whereas Custom2 is at 4200, -6. Again, later on, looking on a calibrated monitor, I preferred Custom2; however, I did most shooting in automatic white balance.

Next, I “softened” the G9 settings by minimizing the contrast, sharpening and saturation. The result is as expected. These minimums are popular starting points when the JPEG file is to be post processed. This image is downsized to 50% and cropped so that some details can be checked (click for larger image).
Finally, I went to the extreme settings for contrast, sharpening and saturation.
 This image is downsized and cropped as above. One unexpected result was the file size. Using the “normal” settings, the file size was 4 KB; the file size for the soft, desaturated image was 3.4 KB; the file size for the extremes was 4.5 KB. Otherwise, the results are as expected but at least now I have some feeling for those extremes.
On examining the files in BreezeBrowser and Photoshop, I was surprised that none of the special My Colors settings were retained in the file data. So if you try similar experiments, be sure to take notes.
Although all went smoothly, it seemed strange to be making these changes in-camera. I never shoot this way so I was constantly checking and fiddling with the camera to set, unset, reset, etc. My own preference is still to shoot in raw mode and make such adjustments in postprocessing.
.
Friday, February 1, 2008
G9 and the In-Camera JPEG
.
The G9 can create its own JPEG; I’ve taken to calling this the in-camera JPEG.
The G9 in-camera JPEG can make quite a nice picture and is very convenient. It can even be customized and fine tuned through the G9 options. I sometimes think of the in-camera JPEG as being analogous to a slide made with transparency film. A particular type of film would be purchased to match the conditions and purpose of the photo shoot; for example, a high speed, outdoor (sunlight) film having saturated colors and high contrast. When shooting in-camera JPEGs, you can, in fact should, make such adjustments. To many photographers, this is only natural. Alternatively, the G9 can and will do this for you.
When the G9 is set on full (green) Auto mode, all adjustments are made for you. In fact, you can’t change the settings for color saturation, contrast, etc. In order to fine tune the G9 JPEG to suit your own tastes, you’ll have to shoot in either P, Tv, Av or M mode – the “creative” modes.
When fine tuning or customizing the G9 image settings, the first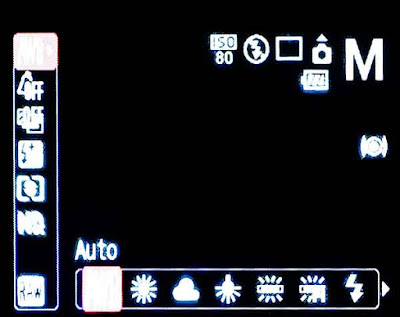 decision to be made is about the lighting – or rather the light source. With the G9 in either P, Tv, Av or M mode, press the Func button to get to the various options. The very first option, top left on the LCD, probably shows “AWB” for Automatic White balance unless you’ve already changed it. Across the bottom of the LCD screen, is a picture of the sun, a cloud, etc. Scroll through these and pick the one that seems to match your setting and light source.
The options just below the white balance (light source) setting are labeled “My Colors”. These are very popular adjustments. The default setting is “Off” (as shown in the first image) but along the bottom of the LCD screen you’ll see options for increasing saturation (“Vivid”), decreasing saturation (“Neutral”), and many more. The very last option, “Custom Color” offers the most flexibility. By selecting “Custom Color” and then pressing the Display button, you’ll have access to fine tuning the contrast, sharpness, saturation, red, blue, green, and skin tone. It may take some tinkering to find the settings that you like. In all honesty, I’ve never used these features.
Even though a JPEG image has been sort of con densed from the full data set collected by the sensor, JPEGs can be edited. Many photographers who routinely edit their JPEGs seem to set their cameras for slightly less contrast, less sharpness, and less saturation. If necessary, these parameters can be fine tuned later during the editing process.
In a future post, I'll show some comparisons of in-camera JPEGs using the default and adjusted settings.
.
The G9 can create its own JPEG; I’ve taken to calling this the in-camera JPEG.
The G9 in-camera JPEG can make quite a nice picture and is very convenient. It can even be customized and fine tuned through the G9 options. I sometimes think of the in-camera JPEG as being analogous to a slide made with transparency film. A particular type of film would be purchased to match the conditions and purpose of the photo shoot; for example, a high speed, outdoor (sunlight) film having saturated colors and high contrast. When shooting in-camera JPEGs, you can, in fact should, make such adjustments. To many photographers, this is only natural. Alternatively, the G9 can and will do this for you.
When the G9 is set on full (green) Auto mode, all adjustments are made for you. In fact, you can’t change the settings for color saturation, contrast, etc. In order to fine tune the G9 JPEG to suit your own tastes, you’ll have to shoot in either P, Tv, Av or M mode – the “creative” modes.
When fine tuning or customizing the G9 image settings, the first
 decision to be made is about the lighting – or rather the light source. With the G9 in either P, Tv, Av or M mode, press the Func button to get to the various options. The very first option, top left on the LCD, probably shows “AWB” for Automatic White balance unless you’ve already changed it. Across the bottom of the LCD screen, is a picture of the sun, a cloud, etc. Scroll through these and pick the one that seems to match your setting and light source.
The options just below the white balance (light source) setting are labeled “My Colors”. These are very popular adjustments. The
 default setting is “Off” (as shown in the first image) but along the bottom of the LCD screen you’ll see options for increasing saturation (“Vivid”), decreasing saturation (“Neutral”), and many more. The very last option, “Custom Color” offers the most flexibility. By selecting “Custom Color” and then pressing the Display button, you’ll have access to fine tuning the contrast, sharpness, saturation, red, blue, green, and skin tone. It may take some tinkering to find the settings that you like. In all honesty, I’ve never used these features.
Even though a JPEG image has been sort of con
 densed from the full data set collected by the sensor, JPEGs can be edited. Many photographers who routinely edit their JPEGs seem to set their cameras for slightly less contrast, less sharpness, and less saturation. If necessary, these parameters can be fine tuned later during the editing process.
In a future post, I'll show some comparisons of in-camera JPEGs using the default and adjusted settings.
.
Subscribe to:
Posts (Atom)