Wednesday, December 30, 2009

Best Photos of 2009

.
Once again, it’s that time when we customarily review the best, worse, etc., etc. of the past year. I now get to be judge, jury and the only contestant in my personal photo contest. While searching for potential entries, I was somewhat disappointed to find I’ve spent more time on testing and technique than on producing “fine art” photographs. On the positive side, I’ve taken even more photographs of my granddaughter.

I sure like my new 7D. For a couple of weeks I was concerned that my own 7D had the focus problem that had so occupied Internet discussion forums. I finally realized that my apparent problem was actually a combination of Canon’s focusing logic, lens calibration, depth of field and (in my opinion) the 7D’s need for additional capture sharpening. I’ve calibrated my lenses and now use center point focusing, higher numbered f stops and more capture sharpening. Perhaps the 7D update to ACR helped a bit as well.


In the above picture, the on-camera flash of the 7D was used to trigger a 580EX with Stofen diffuser that was above and slightly behind her. The room also gets good light from the doorway. The ratio of 580EX to 7D flash was set at 4:1. A good picture, if I do say so myself and extremely popular within the family. The song? “When Christmas comes to Town”.


With the G9, I rarely attempted action photography and am on a steep learning curve with the 7D. The above photo of a white pelican landing is one of my better efforts. Previously, I posted other photos of white pelicans at LSU. Notice that the pelican in the background is out of focus even though the aperture was set at f8; the depth of field was simply too shallow with the 100-400mm zoom at 400mm. This is not a focus problem.


I worked hard to make the above “real estate” photo of a large bathroom using the G9 plus wide angle converter, many wireless flashes and stitching to get the final image. Alas, when entered in a Strobist contest, it did not get even an honorable mention. I suppose I shouldn’t call it my best shot of 2009 but I do like it.


I really like the above pier in sunrise image and posted it previously. My original thought was HDR techniques so I used auto bracketing in the 7D to capture several exposures. Somehow, my HDR efforts just did not appeal to me so the above image is from a single shot. Yes, the colors are not particularly true; however, the colors are nearly the same as the 7D in-camera JPEG using auto white balance (meaning that the white balance is actually wrong). However, it was a beautiful morning.


Back to the G9 for my best shot of the year. Again, I thought to make an HDR image but quickly reverted to processing a single file. My wife likes it – always a good sign – and it was a winner in one of the monthly competitions at our photography club. I liked it enough to post previously.

Equipment wise, if 2008 was the year of the G9 for me, then 2009 was a transitional year to the 7D and 2010 will be my year of the 7D. I’ve resolved to focus more on content than equipment and was pleased to note that some of my better photographs had been previously posted. I plan to continue posting my better efforts. We’ll see how this resolution works out.

Happy New Year!
.

Wednesday, December 16, 2009

The Tenset

.
At the Online Photographer, Mike Johnston is pushing his followers to make a "tenset" of their top ten photographs. Mike's idea is that a website should begin with the tenset so that the viewer can quickly get an idea of the photographer's style and quality. Mike is a strong believer in the redact and reify process. My own Top Ten is at SmugMug instead of a personal site -- not exactly as Mike recommended but much easier to set up and perhaps avoids some of the operational and interface problems he describes.
.

G11 Review at DPReview

.
The long awaited review of the Canon G11 is now available at DPReview. I took this as a very positive review; however, judging by some comments in the discussion forum, others were disappointed. Meanwhile, I still have my G9 and am learning the 7D.
.

Thursday, December 10, 2009

G11 Review by the Strobist

.
The Strobist, David Hobby, has been a fan of the G Series Powershots since the G7 in spite of his otherwise devotion to Nikon DSLRs. Now he has replaced his G10 with a G11 and writes about it here. He also explains the concept of overpowering the sun and tricking the G11 into high speed sync with non-Canon flashes. I learned to do this with my G9 by following his examples (and am missing that ability with my new 7D).
.

Monday, November 30, 2009

More White Pelicans

.
On a nicer and better lit day than the previous shoot, I again tried the 7D versus the white pelicans. This time, I used a polarizing filter with the 100-400mm IS lens. I stayed a long time, filled up the 8GB card, edited the card, filled it again, edited it again and filled it again – all on the same battery! I was impressed.


Sometimes I was shooting birds in the sky, sometimes birds in the water and sometimes birds against a backdrop of foliage. I experimented with the auto focus settings as well as Av and manual exposure modes. It seems to me that the best results were with the single center AF point and AI Servo in manual exposure mode. Usually the exposure was around 1/1000 at f8 and ISO 800 (about two stops lost to the polarizing filter).

All in all, I was happy with the 7D and am beginning to feel better about my own skills with it. Here are a few of the better shots.


.

Tuesday, November 24, 2009

7D Tutorial Videos

.
Canon's Digital Learning Center has a series of 16 tutorial videos on the EOS 7D -- well worth checking out!
.

Monday, November 23, 2009

7D Hannah

.
Having previous posted a series on portraits and depth of field based on my G9, I decided to repeat one shot using the 7D. Fortunately, Hannah was still available. The 7D was fitted with a Canon 85mm f1.8 and set in Av mode for f1.8 at ISO 100. The setup and distances were roughly the same as previously posted with the G9.


It was a nice clear day outside and even at ISO 100, the shutter speed was 1/8000 second! Incredible as this seems, it actually is almost exactly the “Sunny Sixteen” exposure albeit shifted quite a bit. The combination of sunlight and concrete made for very harsh lighting and I give full credit to Hannah for not squinting. But, getting back to the point, notice the blurred background. In fact, notice the slight blur of the front tire!

With the setup and a patience model, I just had to try a few shots using the 7D as a trigger for a 580EX flash outdoors. The 7D flash system is very intriguing and I’ll be learning more about it. In fact, I learned something today.

I first attempted to place the 580EX slightly behind Hannah to provide a bit of back lighting and separation from the background. The 580EX simply would not flash. Hand-holding the 7D, I was about 20 feet away. It turns out that you have to remember to turn it on! But even then it would not fire until the 7D was about 4 feet away. I could see the red light blinking on the 580EX but finally realized that the 580EX was seeing a tiny little pop-up flash and a huge bright sun. With the 580EX facing away from the sun, the 7D will easily trigger it from 20 feet away. Lesson learned.

Taking another approach to lighting Hannah, I decided to underexpose the background and use the 580EX to light Hannah from camera right. Accomplishing this was made complicated because the sync speed of the 7D is limited to 1/250 second and at 1/250 second, the ambient exposure was f11. Giving it a try, I switched to manual mode and set 1/250 second and f22 – about two stops underexposed for the background. The 7D flash system was set to an 8:1 ratio for the external flash. The result – first attempt! – is below.


Not too bad for a first try and definitely better than most of my first guesses with fully manual exposure and manual flash.

I like the ability to blur the background and the opportunity to use my 85mm lens with the 7D. As a flash trigger, the 7D seems OK outdoors with a range of 20 to 25 feet provided the auxiliary flash can see the 7D without also seeing the sun.
.

Friday, November 20, 2009

7D around the Harbor

.


I took the 7D and 70-200mm IS f2.8 for an early morning walk around the beach and harbor hoping for a few good shots in addition to a practice session. The image above was the very first shot and is the in-camera JPEG. I’ve decided that I prefer the “Landscape” profile instead of the “Standard” profile. The difference as indicated by the menu is only one more notch of sharpness for Landscape but it seems to me that there are additional differences. Anyway, all these shots were taken with the Landscape profile.

Although the sky was rapidly brightening, a part of the harbor was still somewhat dark so I was tinkering with various ISO, aperture and shutter speeds. A few birds were flying so I increased the shutter speed to 1/800 and tried my hand at BIF (which I learned only recently is “Bird in Flight”!) without much success. The shot below was taken at ISO 400, f8 and 1/800 using AI Servo. Unfortunately, it is about 2 stops underexposed so I decided to push the exposure in the recently released ACR 5.6 RAW converter. The result was quite noisy so Noiseware was applied to reduce the noise. The resulting cropped shot below probably represents ¼ the original image size. Not very good but at least somewhat usable.


Later that morning, I came across some fishermen cleaning their catch and attracting many Brown Pelicans. This became a very active shooting session with many quick shots and much movement. All in all, I was more satisfied with the 7D than with my own skills.


The shots above and below would be more impressive if cropped but give an idea of the scene quickly developing in front of me. I was literally just swinging the 7D to my eye and pressing the shutter button.


.


Tuesday, November 17, 2009

7D: White Pelicans at LSU

.

.

Adjoining Louisiana State University are several small man-made lakes and one larger lake, University Lake. Apparently these lakes were dredged from swampland many years ago. University Lake has a nice walking path – about 4 or 5 miles around, I think. University Lake is a also good place to try new photo gear. One of my favorite photos was taken here. I finally got a chance to try the 7D with the 15-85mm at the lake and got the shot above plus a few ducks. Then the pelicans returned.


White Pelicans are sometimes seen during the late fall in these lakes. Apparently the LSU lakes are a convenient stop-over on the migratory path from Canada to South America.

The White Pelican (Pelecanus erythrorhynchos) is a large bird some four to 6 feet tall with a wing span up to nine feet. Although predominately white, their wing tips are black and their bill is orange.


These large birds are graceful in flight but, unlike the Brown Pelican, do not dive for food. Instead of diving, White Pelicans work together to gather fish while swimming. Watching a flock of White Pelicans swimming, it is easy to imagine that they are herding fish! Each bird is said to need about four pounds of fish daily.

White Pelicans are protected by the Migratory Bird Treaty of 1972.
.

Friday, November 13, 2009

Rethinking DOF

.


For my 7D, I’m recalibrating myself when setting the aperture. One of the complaints – or benefits – of my G9 was the extreme depth of field that was in focus. In fact, getting a blurred background was a challenge when using the G9. Further, because the sweet spot for the G9 was around f4, my choice was usually f4 or so. After two years of primarily using the G9, this choice became habitual.

For the same f-stop, the depth of field with the 7D is considerably less than the G9. For this shot, I was using the 7D with 15-85mm lens set at 70mm and f8. This image was down sampled from the in-camera JPEG. From roughly six feet away, the depth of field is only about seven inches. I focused on the face but clearly the hand is not in focus even in this downsized image. With my G9 at f8, the depth of field (for the same image size) would have been about 22 inches. Even with my G9 at f4, the depth of field would have been about 10 inches.

I’m not particularly bothered by the hand being out of focus here; in fact, that’s OK. I do wish the little bird were a little better focused though. The slightly upward and left-right angle of this shot puts the bird at the edge of focus and a bit soft. I should have shot this one at f11 or even f16 and focused more towards the beard. The depth of field at f16 would have been (coincidentally) 16 inches.

I knew to use higher f-stop numbers with the 7D but habits are hard to break.
.

Friday, November 6, 2009

7D Review

.
DPreview has posted its review of the Canon 7D. I'm glad I got mine!
.

Saturday, October 31, 2009

7D and LensAlign

.


One of the intriguing features of the 7D is that it can be fine-tuned to match individual lenses. This feature is called AF (for Auto Focus) Microadjustment. Of course, the argument can be (and is) made that such adjustment should not be necessary; however, I’m glad that the 7D has this capability. It just makes sense to me that tolerance stack-up can become a problem as various lenses are matched to various cameras.

On the 7D, AF Microadjustment is made through the custom function menu (the next to last menu shown) as C. Fn III-5. The instructions for making this adjustment begin by stating that this adjustment is not normally required – a comforting thought. There are three basic settings: 0) Disable 1) Adjust all by same amount and 2) Adjust by lens. The default setting is Disable. Go a little deeper into that menu and there is an adjustment scale ranging from -20 to + 20; the default is 0. But how does one know the correct setting?

Basically, the AF Microadjustment is made by trial and error: Take a picture, check the focus, make an adjustment, take another picture, etc. The LensAlign devices are handy when making these adjustments.

Along with my 7D, I bought the Canon 50mm f1.8 prime lens. This is an inexpensive lens that has a good reputation; however, I was very disappointed in my copy. I finally realized that it simply was not focusing properly. That’s when I bought the LensAlign Lite system shown above. In fact, the photo shown above is cropped from a shot made with the 50mm at f1.8. (The 50mm is still soft wide open but gets considerably better about f5.6 or so.)

There’s no point in my going through detailed instructions about LensAlign as instructions are readily available from the RawWorkflow site. Suffice it to say that the LensAlign Lite kit consists of a vertical target and an angled scale. After aligning the camera to the target using a mirror, the mirror is removed and a picture taken of the target using single point autofocus. As seen in the photo above, when focused on the target, my 50mm was actually focused in front of the target.

Instead of exactly following instructions, I simply ran the microadjustment range from -20 to + 20 while the camera was mounted on the tripod. I then examined the images on my computer screen using BreezeBrowser which conveniently displays the AF adjustment for each photo.


The photo below was made using the 50mm with a -10 AF adjustment.


and the image below was made with a setting of +20


I finally settled on a +15 adjustment for the 50mm. Other adjustments with my own 7D were:
Canon 85mm f1.8 at +10
Canon 18-55mm at 0
Canon 70-200mm at -5
Canon 100-400mm at 0

I’ve also tested a Canon 28-135mm but can’t quite find the happy place for the adjustment. I’ll probably keep it at 0 and continue to call it “soft”.
.

Monday, October 26, 2009

G11 Review at Luminous Landscape

.
At the Luminous Landscape site (one of my favorites), Michael Reichmann gives his hands-on report on the G11. He makes comparisons to the G10, especially with respect to noise, and also to the Panasonic GF1.
.

Sunday, October 25, 2009

Rural Life Museum

.


Within Baton Rouge, the Rural Life Museum is several hundred acres of farm land donated to Louisiana State University by the Burden family in 1964. The museum still includes farm land and flower gardens used by LSU as well as a collection of buildings and artifacts from the 1800s. It is a great place to visit and photograph. I often go there when trying out new photography gear or techniques. One of my favorite photos, made with HDR techniques, was taken at Rural Life Museum.

It was time to take the 7D to Rural Life Museum for a practice session. This was to be a simple session using only one lens (Canon 28-135mm), no flash and no tripod. Since many of the rooms and cabins are unlit, this would be a challenge and would require high ISO sensitivity. Also, I wanted to photograph some scenes having extreme dynamic ranges. Finally, I decided to emphasize the in-camera JPEG (“standard” settings) of the 7D.

The top picture of this post was taken at -1 exposure compensation (from ISO 100, 1/80, Av mode at f5.6) but the grass at left front is still a bit overexposed. The histogram is quite full. This would probably be a good candidate for HDR but I didn’t bracket.

The scene below is an interior shot of a reconstructed school room. The 7D was set for ISO 3200, Av mode yielded an exposure of 1/50, f4.5.


Here’s another shot with very bright and dark areas; ISO 100, Av mode at f8, 1/200 second, -1 exposure compensation.


Another ISO 3200 shot below using manual exposure at f5, 1/25 second inside one of the cabins.


All in all, a good practice session and a pleasant afternoon.
.

Thursday, October 22, 2009

G11 and S90 at Best Buy

.
Our local Best Buy store has the G11 and S90 cameras on display and in stock. For that matter, they also have the 7D (but not the 15-85mm lens that I was hoping for). It’s interesting how frenetic demand is quickly turning into routine shopping and purchasing.

Side by side, the S90 is impressively smaller than the G11. I couldn’t help but think “If the G11 sensor can fit into this smaller camera, then a larger sensor could fit into the G11.” This extensively debated topic and wish will continue and those “laws of nature” explaining why a larger sensor cannot be squeezed into a G series camera will probably be revoked.

In my hand, the G11 felt strangely familiar and, at the same time, different. I still think, as I did for the G10, that the stacked control dials are awkward and the exposure compensation dial is misplaced. In my brief hands-on, the G11 did not feel quite as comfortable as my customized G9. Realistically though, this feeling was based more on familiarity than ergonomics.

The articulated LCD was very nice and I did not find the slightly smaller display to be significant. The G11 menus are somewhat different from my G9. Most noticeably, the bottom row of text (displayed on the LCD) is an elaboration of the menu item. For example, if “Mute ON” is selected as the menu item, then the bottom row of text reads “Turns off camera sounds”. Nice touch. To accomplish this, the menu uses five rows of text per screen for the menu items while the sixth row is dedicated to the explanation. (My G9 also has six rows but all contain menu items.)

When extended, the lens seemed a little larger in diameter than on my G9 but that could have been my imagination. Looking through the viewfinder, a bit of the lens intrudes but disappears on zooming in a small amount.

I’m sure that the G11 will be a good seller for Canon but suspect that the S90 will turn out to be even more profitable.
.

Wednesday, October 21, 2009

7D Firmware Update Version 1.0.9

.
Just in case anyone has missed it, an update is available for the 7D firmware. My own 7D came in with Version 1.0.7; the update is Version 1.0.9. More information and the firmware download is available here.

The firmware upgrade procedure is well described by Canon and is relatively straightforward – in other words, I did it and my 7D firmware is now Version 1.0.9. No apparent differences between the versions in so far as I can tell in my own limited and normal use.
.

Tuesday, October 20, 2009

7D Flash System

.


OK, so this is not a great picture. But what if I told you that the Canon 580EX was triggered wirelessly by the built-in flash of the camera at a flash ratio of 2:1 and the flash compensation was also set by the camera at -1? For one thing, you’d know that the camera was the new Canon 7D (because the Nikons can’t trigger the 580EX!).

One of the more intriguing features of the 7D is this ability to control an external flash via its own small built-in popup flash. This was a strong selling point to me and I’m tinkering with it to learn the system. Here’s a link to an ongoing discussion and FAQ about the 7D flash.

About all I can personally say about the 7D flash system at this point is that mine works with my Canon 580EX and 420EX flashes – individually or together. I’ll also gripe a bit that the wireless flash control menus are awkward to access repeatedly while learning the system. Here’s hoping that I’ve overlooked a simple shortcut.
.

Friday, October 16, 2009

7D Menus

.
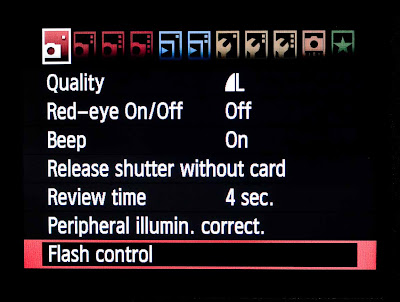
The 7D is so versatile that an extensive set of controls and options must somehow be made available – in other words, the menu system is quite extensive.

At first glance, the menu system is also intimidating and I’m not exactly new to either cameras or computers. I am, however, new to the 7D and coming to it from a 20D and G9. Here’s a set of photos of the various menus and options of my 7D. Note that these photos are not all inclusive of the 7D menu system. Many of the menu item shown offer several optional settings. In general, the procedure is:

1) Press the Menu button (back panel)
2) Rotate the Main Dial (top panel) to move left/right between the various tabs/icons at the top of the display
3) Rotate the Quick Control Dial (back panel) to move up/down between the various menu items shown
4) Press the Set Button (back panel, center of Quick Control Dial to select a menu function
5) Be prepared to repeat steps 3 and 4 (perhaps more than once).

I’m sure that most of the menus and selection processes are routine to many Canon users but perhaps this posting and images will be useful to newcomers to the system.

These settings are not necessarily the defaults nor my recommendations because I've been tinkering with them. The menu item shown as being selected is (I think) the last menu item that I accessed.


.

Sunday, October 11, 2009

Friday, October 9, 2009

7D vs G9 at ISO 1600

.
I’m laughing at myself for misconceptions and memories of the quality of my G9.

Since getting the 7D, I’ve been randomly playing with it and marveling at its capabilities. Although I have other lenses, all my shots so far have been with the (cheap) 50mm fixed lens. I thought this was supposed to be a good lens and would give me a large aperture 80mm equivalent for portrait work. One of my first shots was this one (taken out the door, down the hall and cropped to hide the junk on my desk) at f2.8 and ISO 1600.


I didn’t do anything special to get this picture – just set ISO 1600, f2.8 and fired off a Av mode in-camera JPEG. The small rectangle AF focus point was placed on the center of the bookshelf. This is a 100% crop so we are pixel peeking here. All done rather simply and quickly. No matter how I rationalized, this is not a good result. In fact, my G9 would do better.


Or would it? The G9 was handy so I set it for ISO 1600, zoomed in a bit to get roughly the 50mm equilvalent focal length and fired off another shot. The G9 shot was also at f2.8. Here’s a similar 100% crop.


Hmm, perhaps that 7D does take a better ISO 1600 shot after all!


I’ve been tweaking the focus adjustment for that 50mm lens but have concluded that it is just very soft at f2.8. Fortunately, it improves rapidly as the aperture is stopped down. This is a little frustrating to me but, after all, it is a cheap lens.

The 7D was easy to set up and use for basic photography but I have a lot to learn about it.


.